Method 1: Install a Theme Through WordPress Admin Theme Search
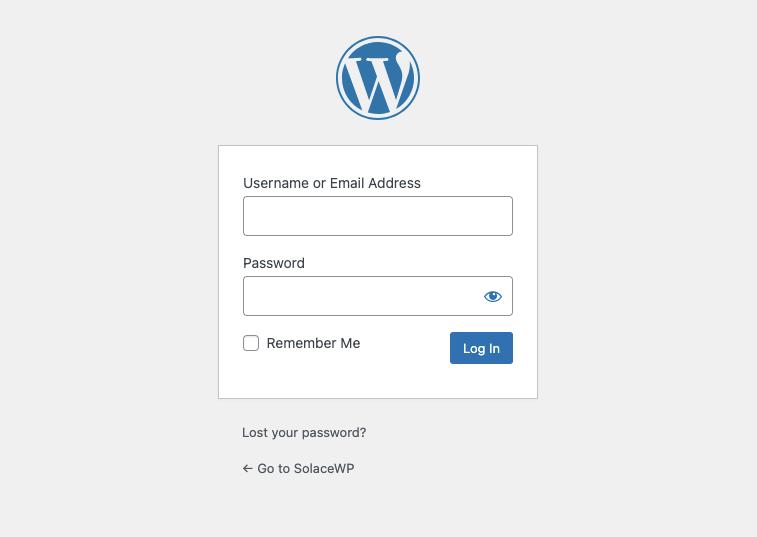
To initiate this process, log in to your WordPress admin area.
Installing a new WordPress theme:
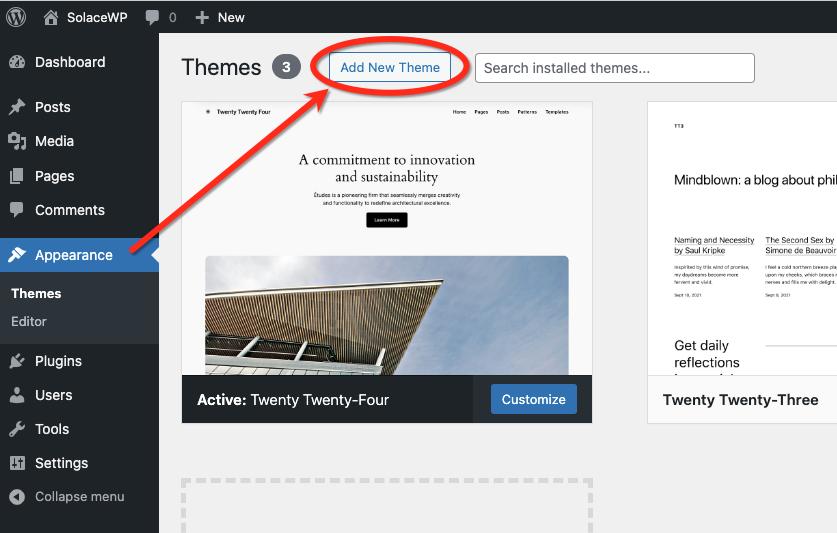
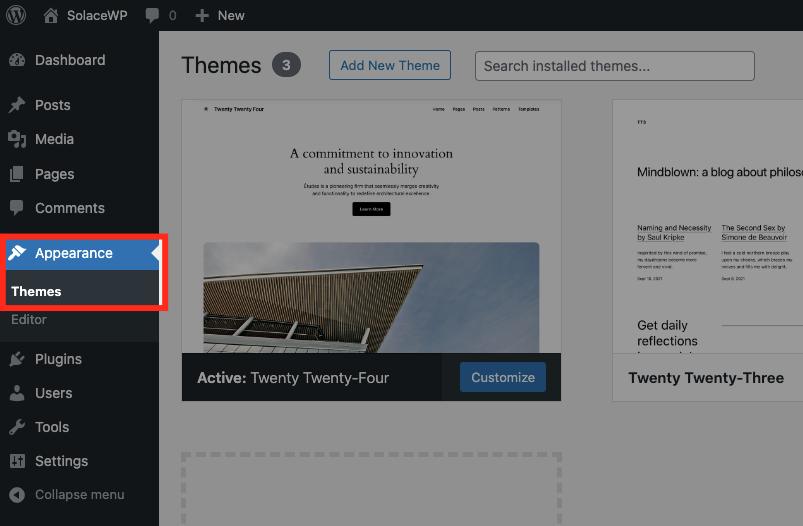
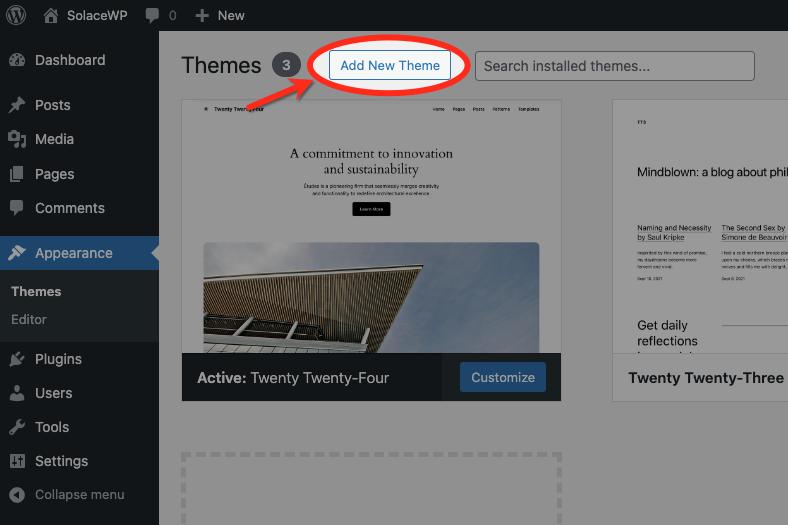
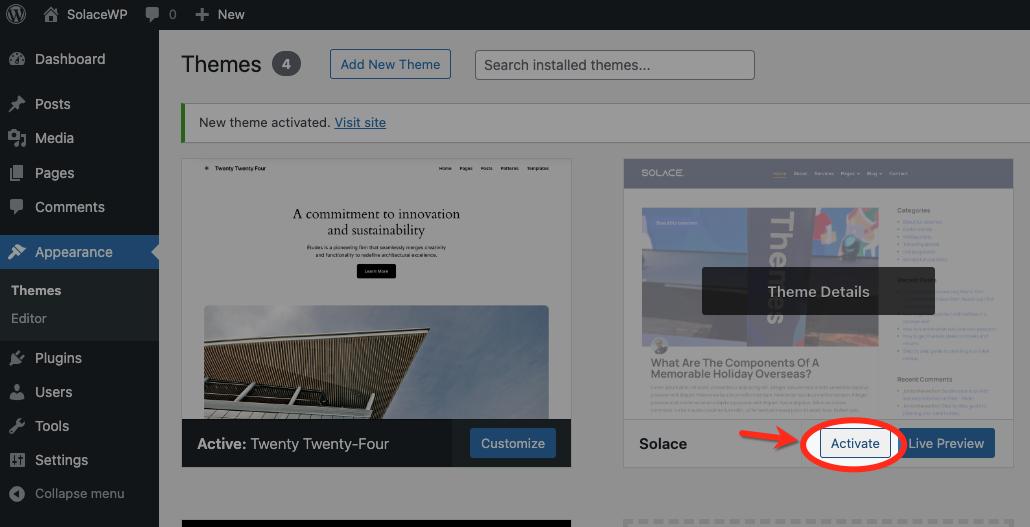
- Visit the Appearance > Themes page and click on the ‘Add New Theme’ button.
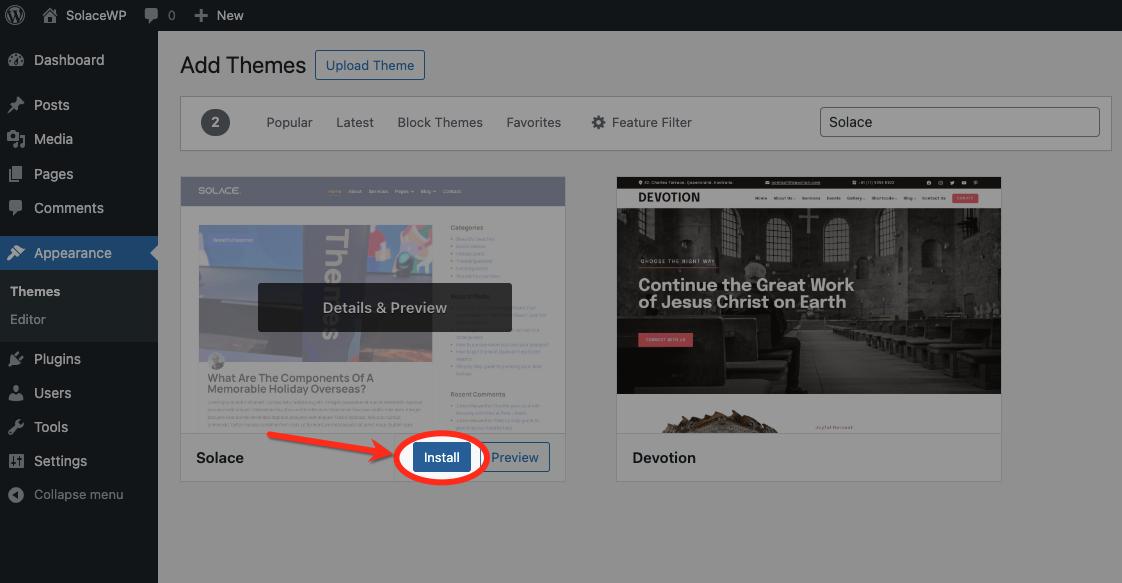
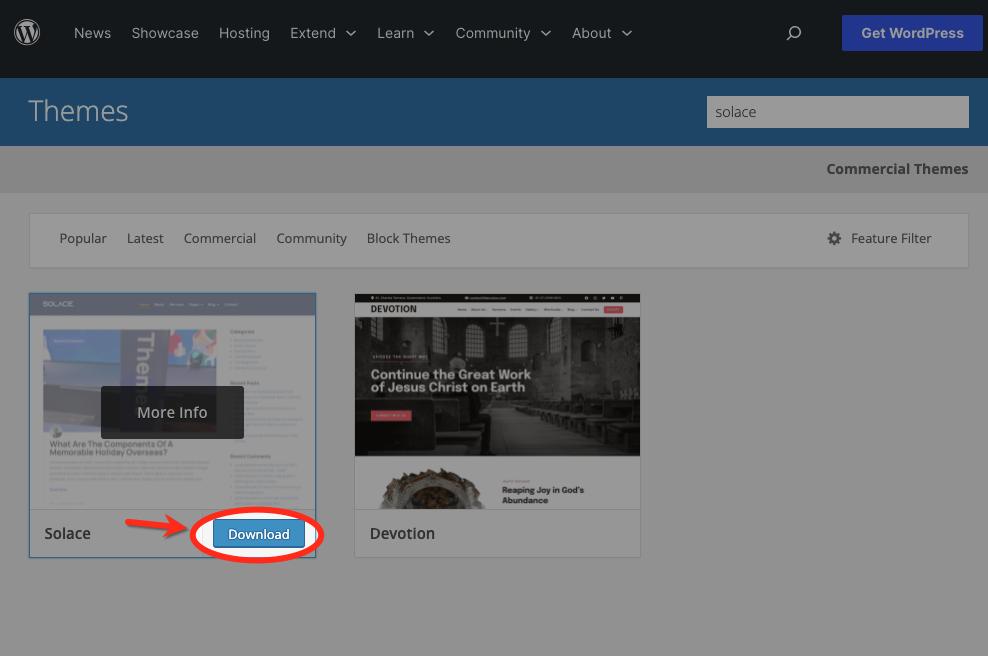
- On the next screen, you can directly search for the SolaceWP theme by entering its name into the ‘Search themes…’ field.

- Click ‘Install’ when SolaceWP appears in the search results. WordPress will promptly install your chosen theme. Upon successful installation, WordPress will display a confirmation message.
- You will also see the ‘Activate’ and ‘Live Preview’ buttons. To start using this theme on your WordPress website, click on the ‘Activate’ button.
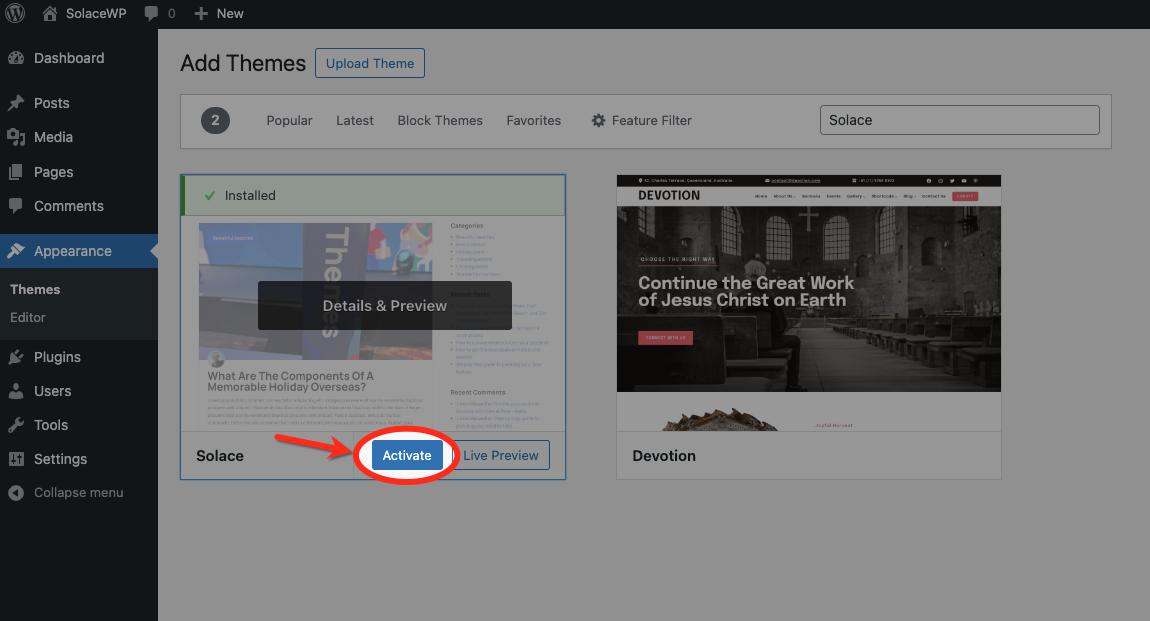
Congratulations! You have now successfully initiated and activated the SolaceWP theme on your WordPress site without any further hassle.
Method 2: Add a Theme via the Upload Option in the WordPress Admin
- Download SolaceWP Theme:
- Visit the official SolaceWP website or WordPress.org to download the SolaceWP theme.
- Save the theme files to your computer.
- Log in to Your WordPress Admin:
- Open your web browser and log in to your WordPress admin panel.
- Open your web browser and log in to your WordPress admin panel.
- Navigate to Themes:
- Go to “Appearance” in the WordPress dashboard and select “Themes.”
- Go to “Appearance” in the WordPress dashboard and select “Themes.”
- Click on Add New Theme:
- Click on the “Add New Theme” button at the top of the Themes page.
- Click on the “Add New Theme” button at the top of the Themes page.
- Choose the Upload Option:
- Click on the “Upload Theme” button.
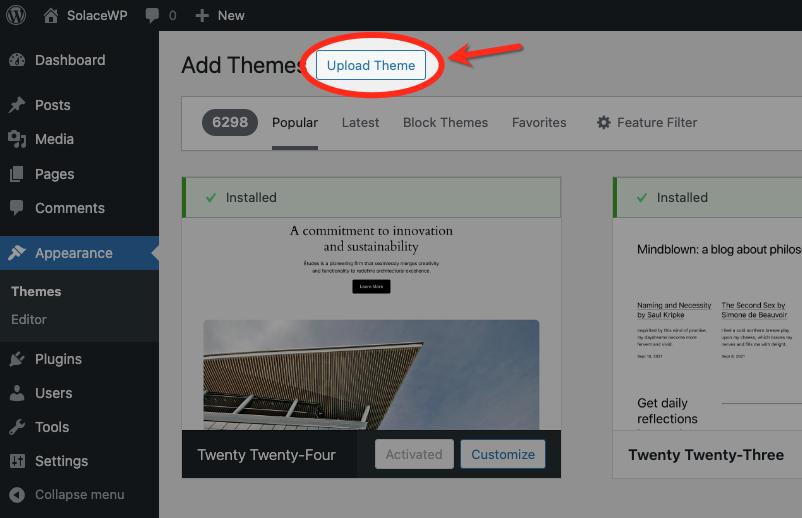
- Click on the “Upload Theme” button.
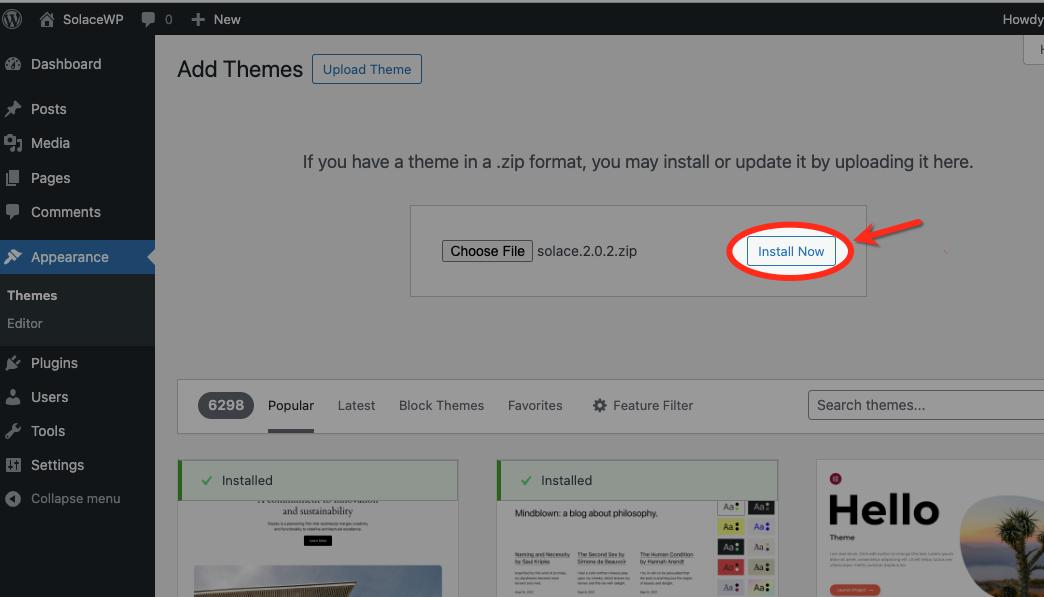
- Upload SolaceWP Theme:
- Click on the “Choose File” button.
- Select the SolaceWP theme ZIP file you downloaded earlier.
- Click “Install Now” to start the upload.
- Activate the Theme:
- Once the upload is complete, click the “Activate” button to make SolaceWP your active theme.
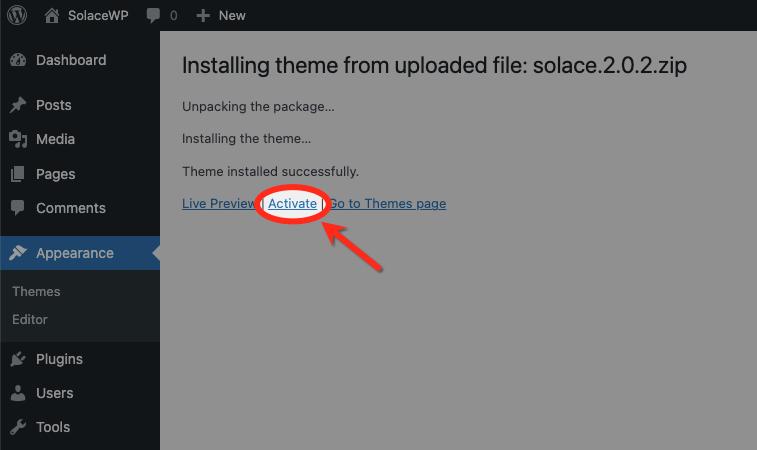
- Once the upload is complete, click the “Activate” button to make SolaceWP your active theme.
- Confirmation:
- WordPress will display a success message indicating that the theme has been installed and activated.
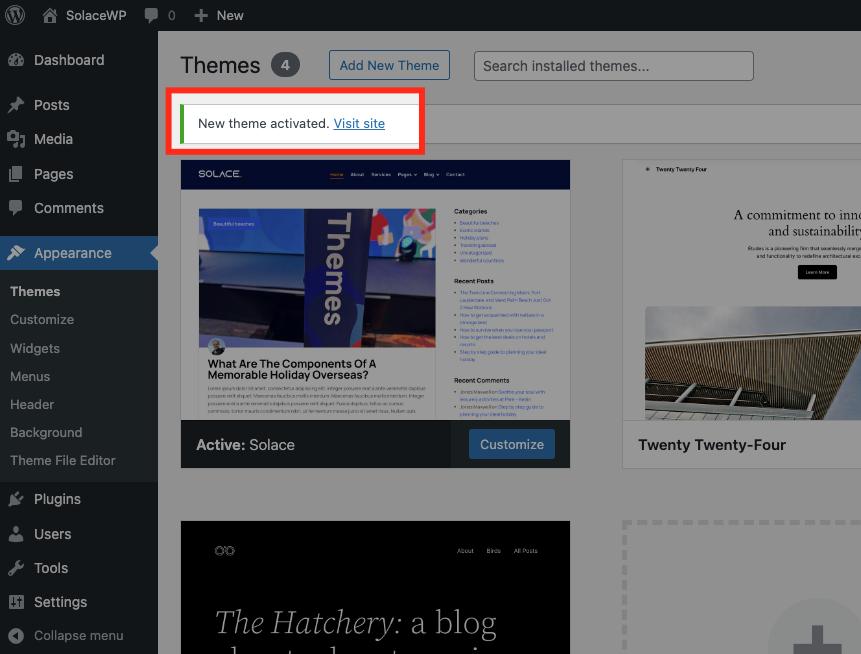
- WordPress will display a success message indicating that the theme has been installed and activated.
- Explore and Customize:
- You can now explore and customize the SolaceWP theme according to your preferences.
- Visit the “Customize” section to modify theme settings, layouts, and other options.
Method 3: Installing a WordPress Theme via FTP
- Download SolaceWP Theme:
- Visit the official SolaceWP website or WordPress.org to download the SolaceWP theme.
- Save the theme files to your computer.
- Extract Theme Files:
- Unzip the downloaded SolaceWP theme file. This will create a folder containing the theme files.
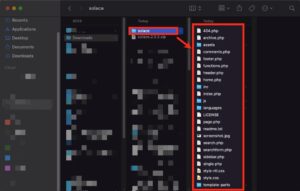
- Unzip the downloaded SolaceWP theme file. This will create a folder containing the theme files.
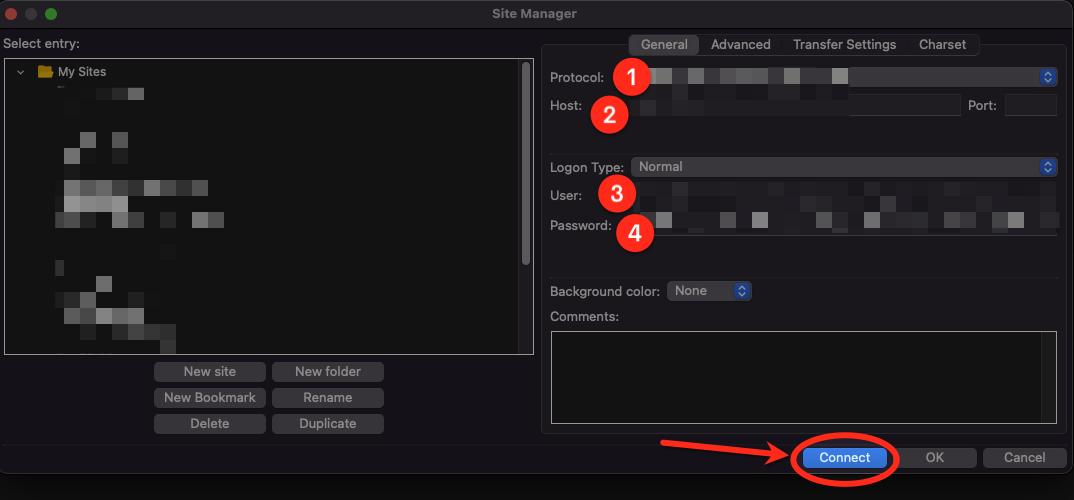
- Connect to Your Server via FTP:
- Use an FTP client (such as FileZilla) to connect to your web hosting server.
- Enter your FTP credentials to establish a connection.
- Navigate to the WordPress Themes Directory:
- Once connected, navigate to the “wp-content/themes” directory on your server.
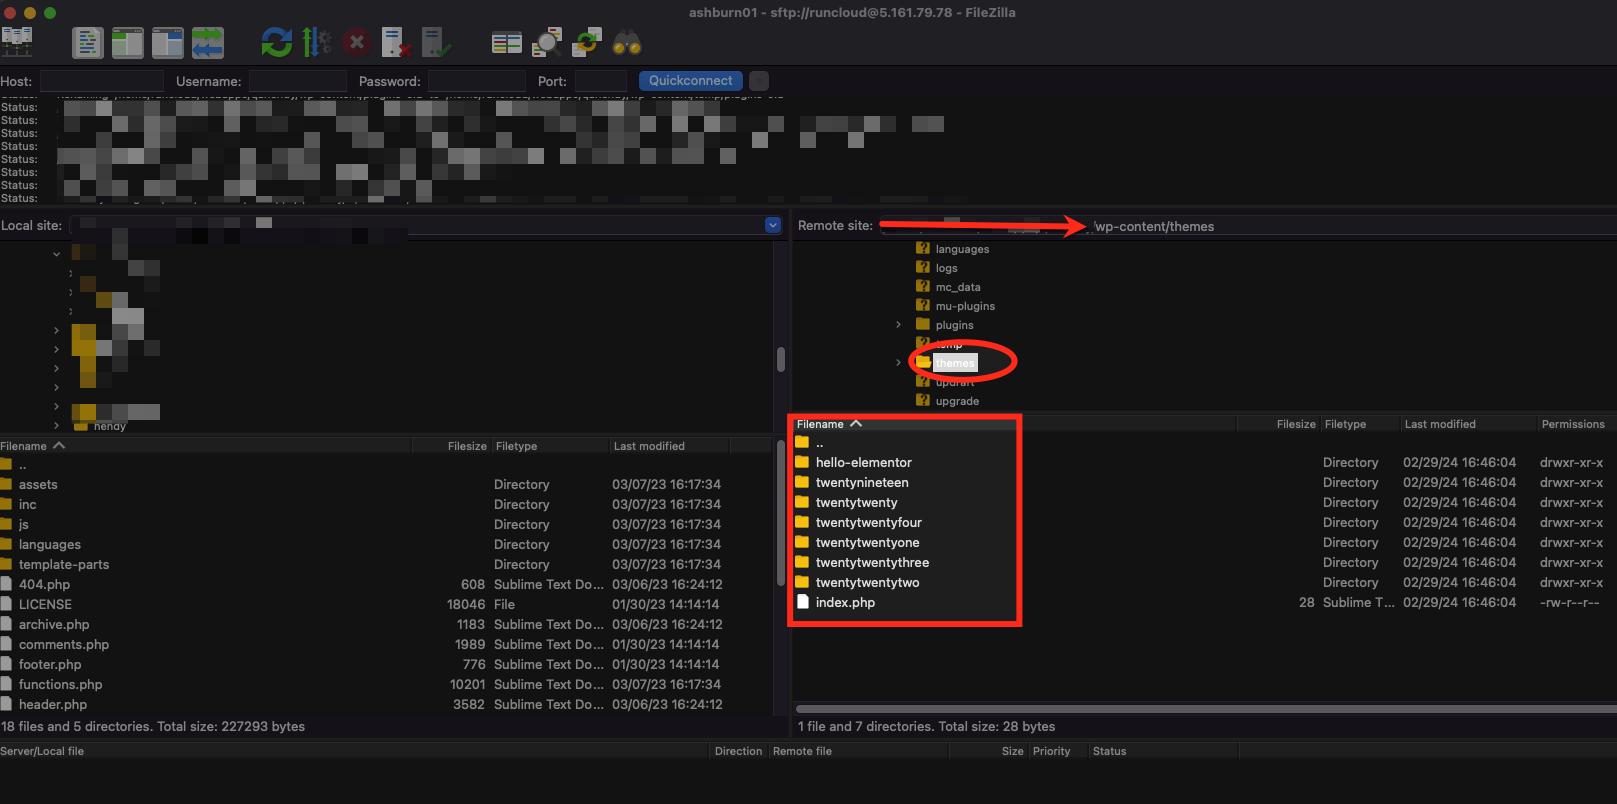
- Once connected, navigate to the “wp-content/themes” directory on your server.
- Upload SolaceWP Theme:
- In your local machine’s SolaceWP theme folder, select all the files and upload them to the “themes” directory on your server.
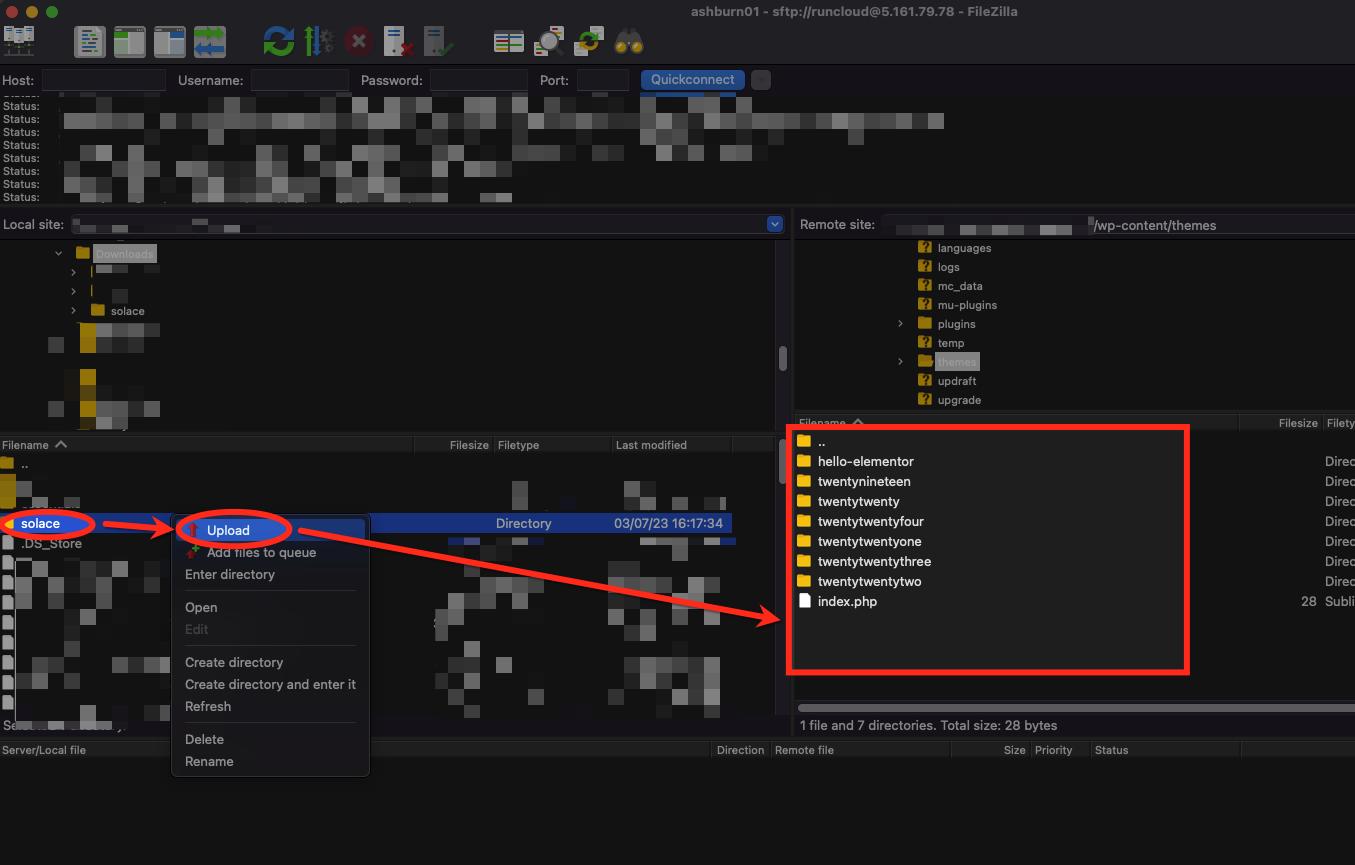
- In your local machine’s SolaceWP theme folder, select all the files and upload them to the “themes” directory on your server.
- Activate the Theme:
- Log in to your WordPress admin panel.
- Go to “Appearance” and select “Themes.”
- You should see SolaceWP listed among the available themes. Click on it.
- Click the “Activate” button to make SolaceWP your active theme.
- Confirmation:
- WordPress will display a success message, confirming that the SolaceWP theme has been installed and activated.
- WordPress will display a success message, confirming that the SolaceWP theme has been installed and activated.
- Explore and Customize:
- You can now explore and customize the SolaceWP theme to suit your preferences.
- Visit the “Customize” section to modify theme settings, layouts, and other options.
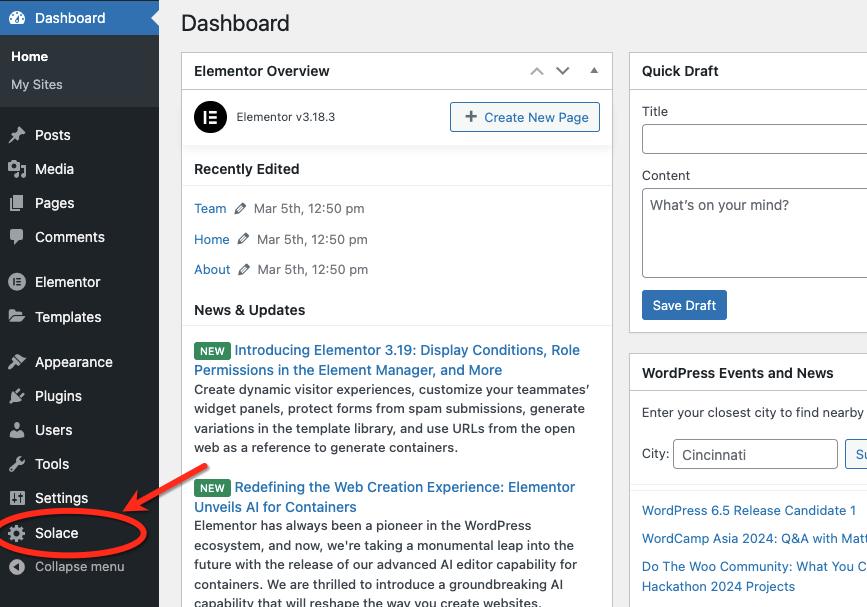
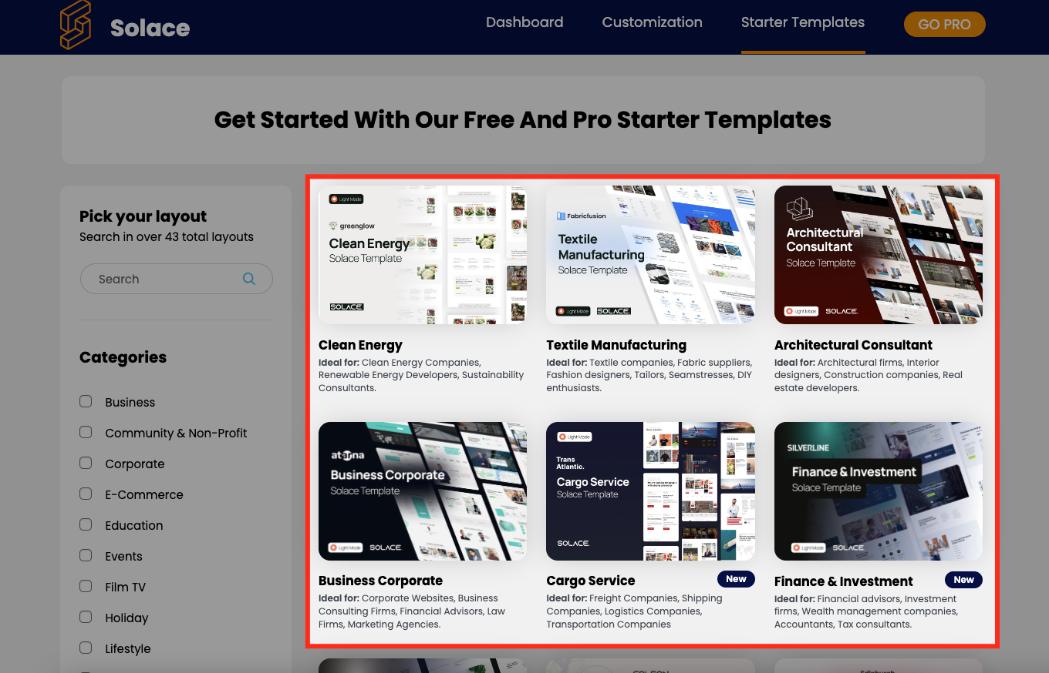
Importing demo content is a process that allows you to set up a website quickly by incorporating predefined templates, layouts, and sample data. It serves as a valuable starting point for users, offering a glimpse into the theme’s capabilities and design possibilities. This guide will walk you through the steps to import demo content using SolaceWP, providing you with a foundation for creating a visually appealing and fully functional website.
Step-by-Step Instructions:
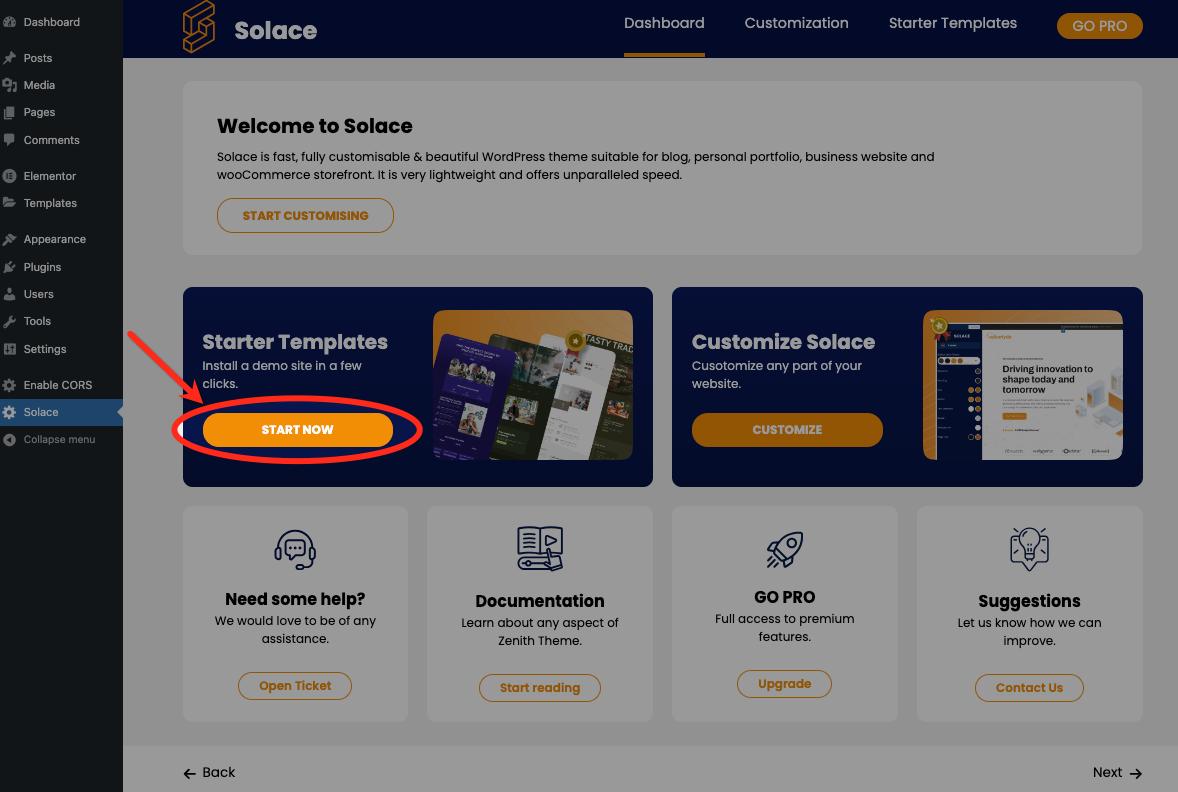
- Navigate to the Solace Menu to access the Solace Dashboard.
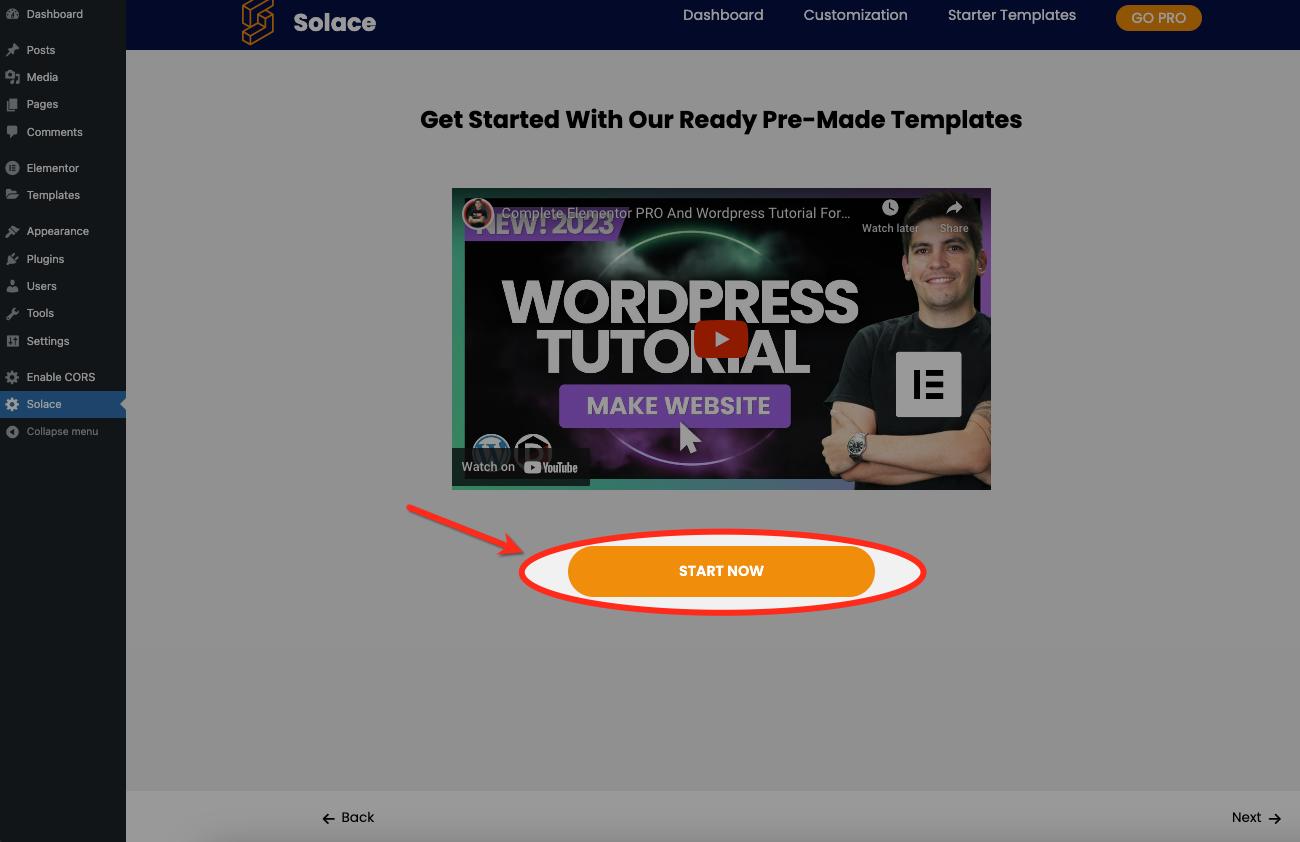
- Click the “START NOW” button to initiate the installation of a demo site.
- Click “START NOW” again at the bottom of the video tutorial.
- Templates can be filtered by category or through the search form. Select your preferred template by clicking on the image or text to initiate the demo content import sequence.
- Customize the logo, color palette, and font style as needed. Check the box labeled “Delete Previously imported sites” if you have already imported the SolaceWP template and wish to delete it; otherwise, you can ignore it, then click the “CONTINUE” button.

- Wait for a few moments until the demo content import is complete.
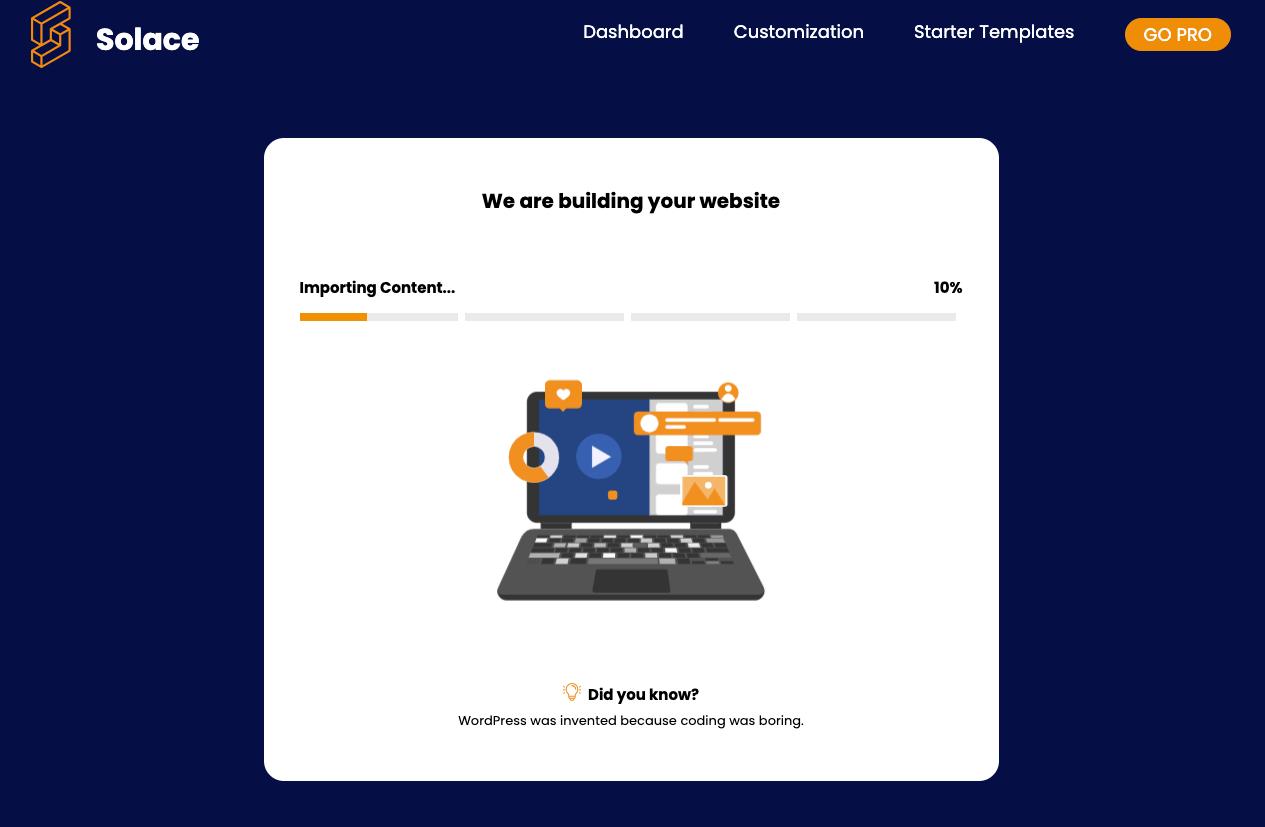
- Click the “CHECK WEBSITE” button to preview the results of the demo content import.

By leveraging the Solace Extra Plugin, you seamlessly jumpstart your website development through efficient demo content import. Following these steps establishes a foundation for a visually appealing and fully functional site.
General Options
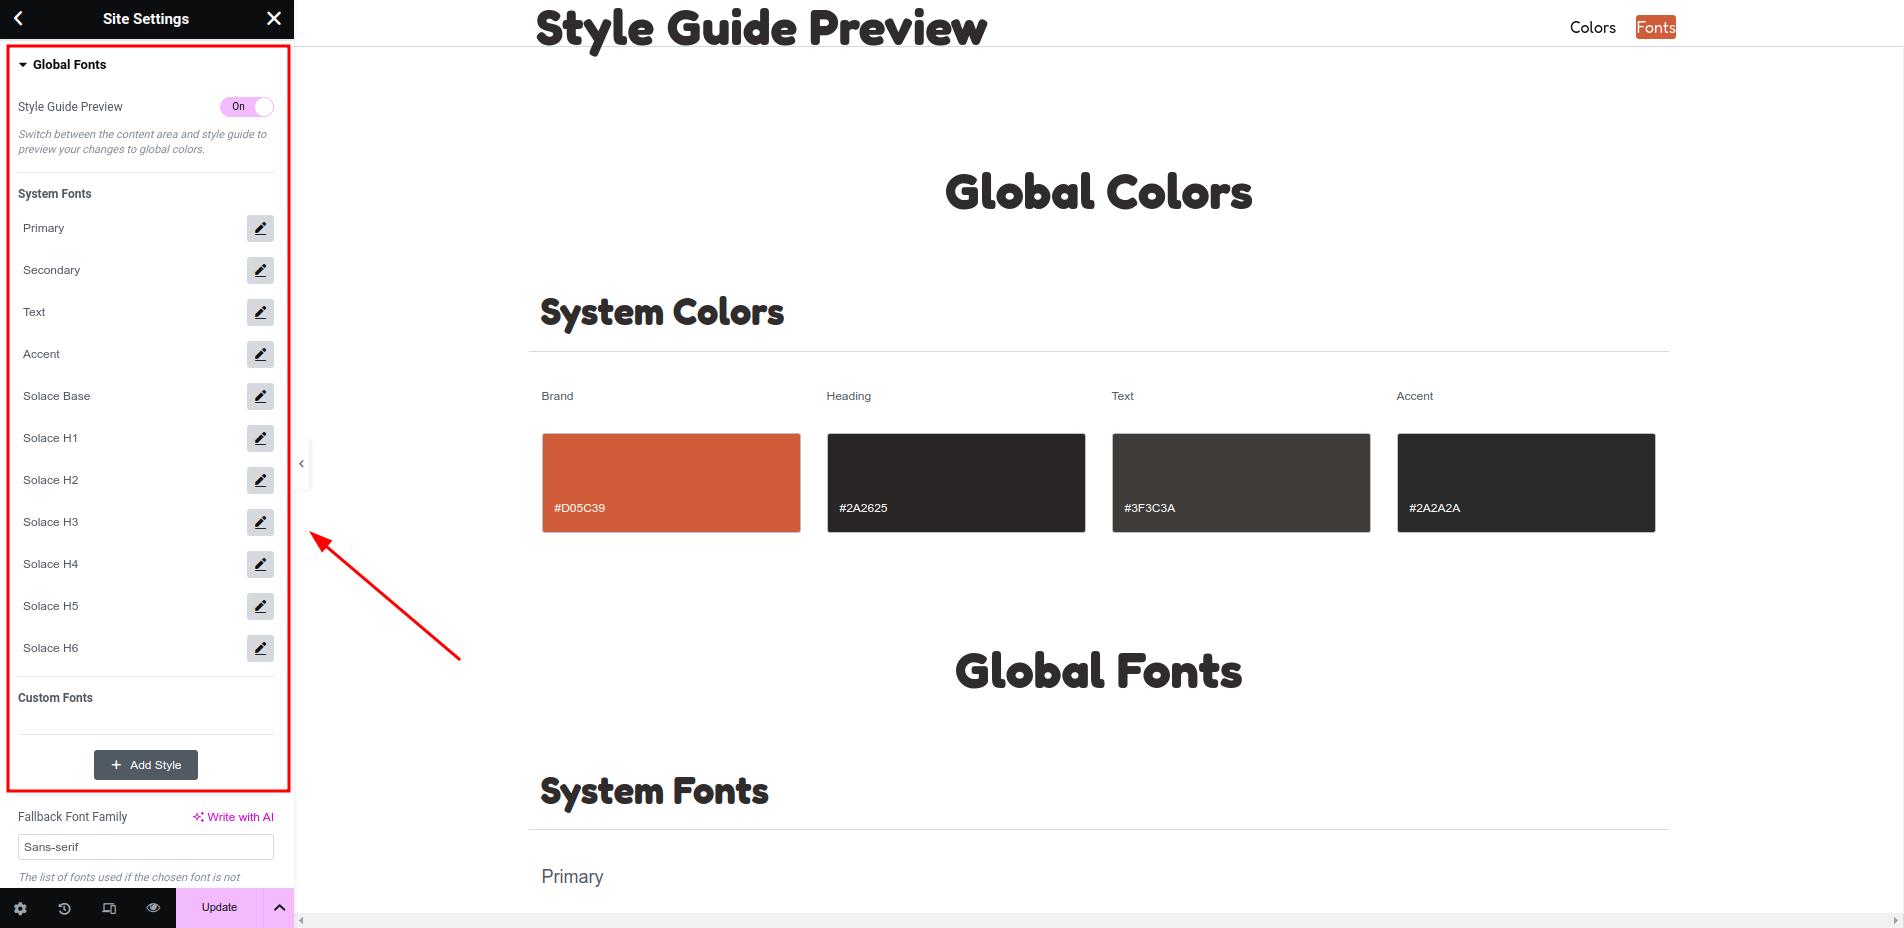
- Colors
Global color palette is used to define colors for all pages and posts. The defined colors will match the Site Settings in Elementor’s color settings. When you create a page with Elementor, set the color scheme to global color to ensure the color is consistent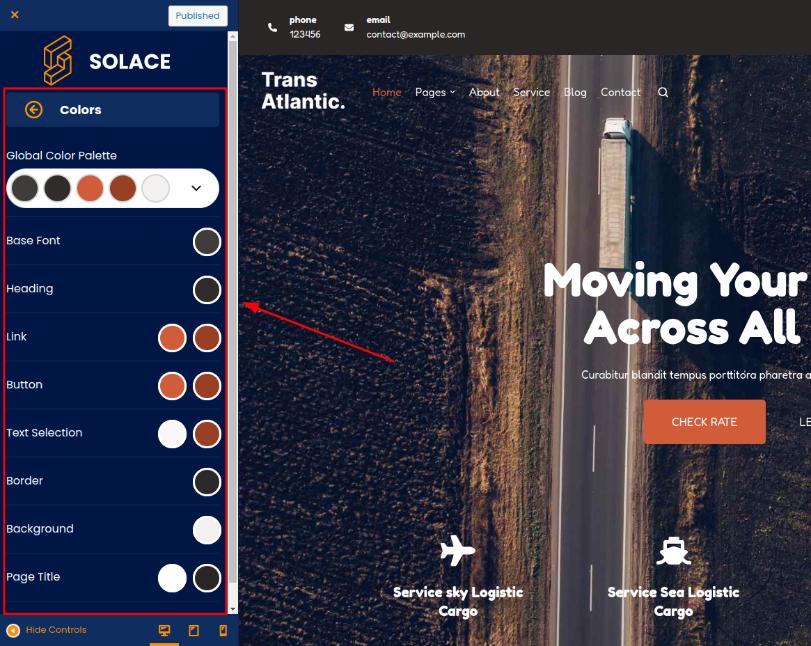
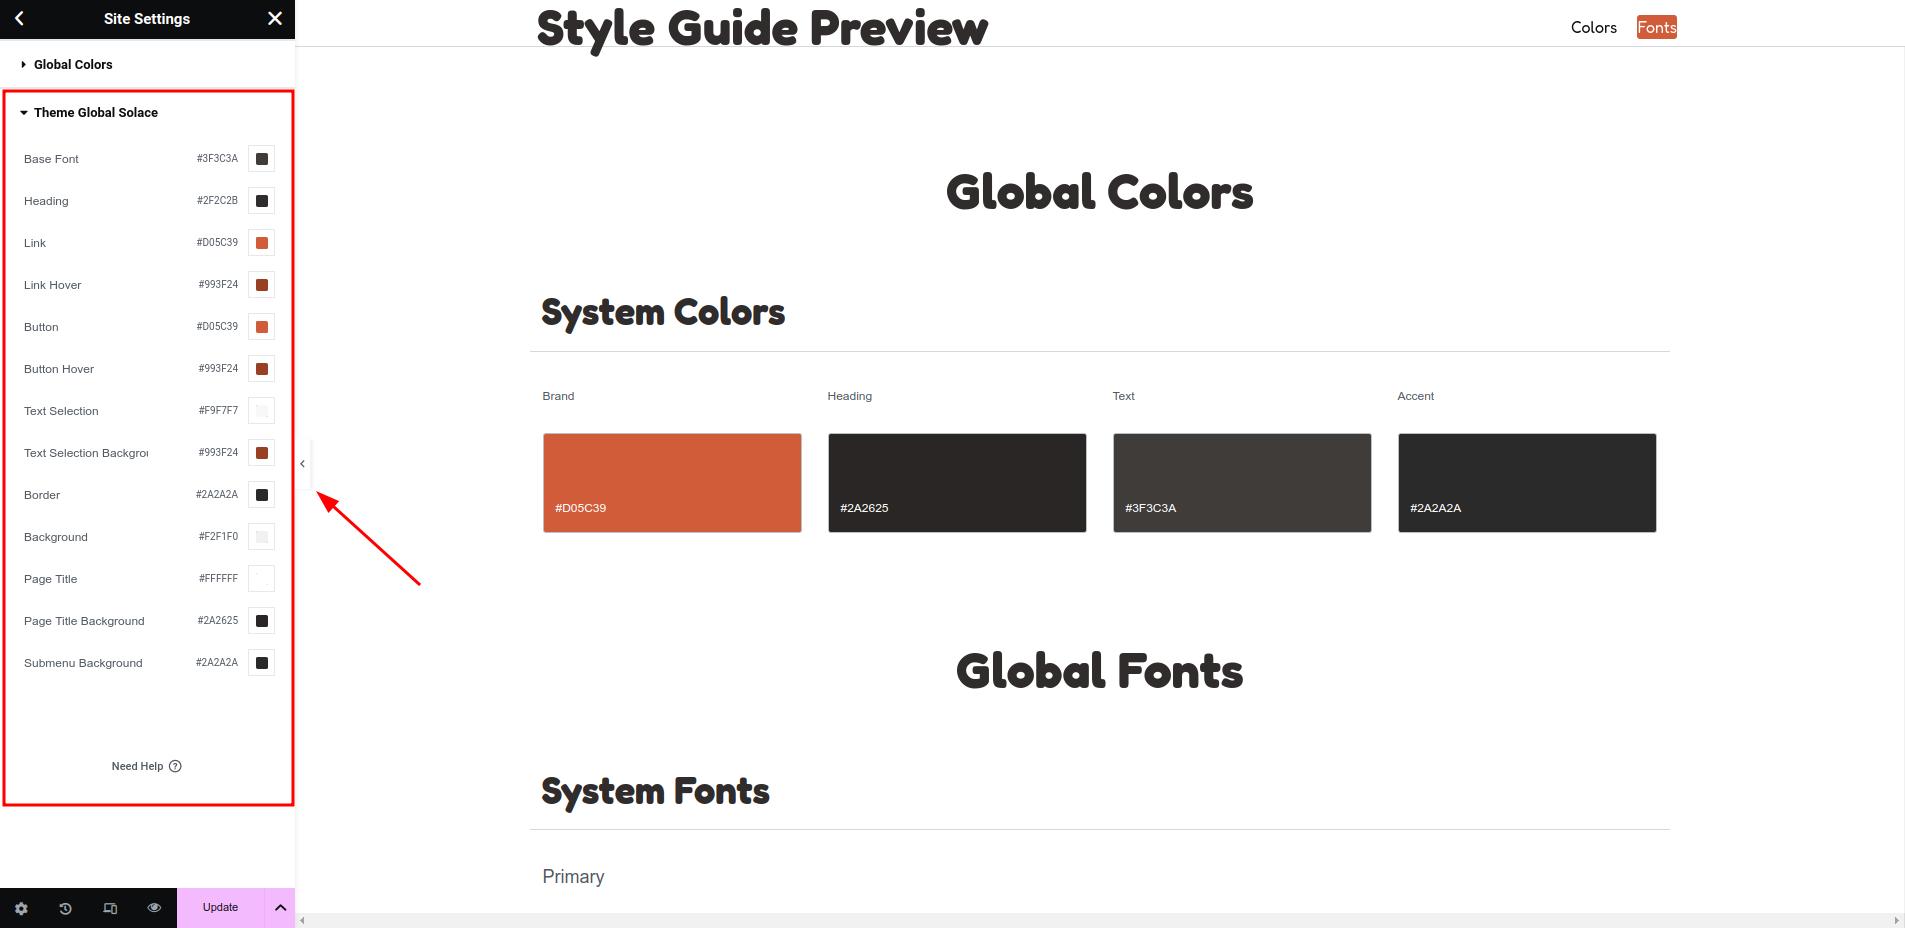
- Fonts
General Options – Fonts allow you to customize every kind of font on a page or post, from the basic font to headings 1 through 6. The font settings in Elementor’s Site Settings are exactly the same to these options. Therefore, to ensure consistency across all pages when creating pages using Elementor, use the global fonts that have been set.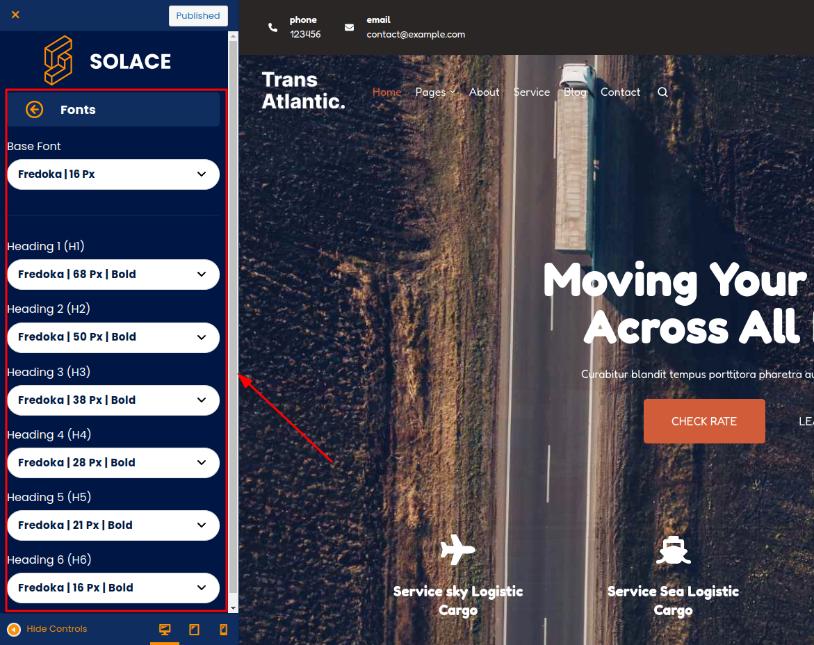
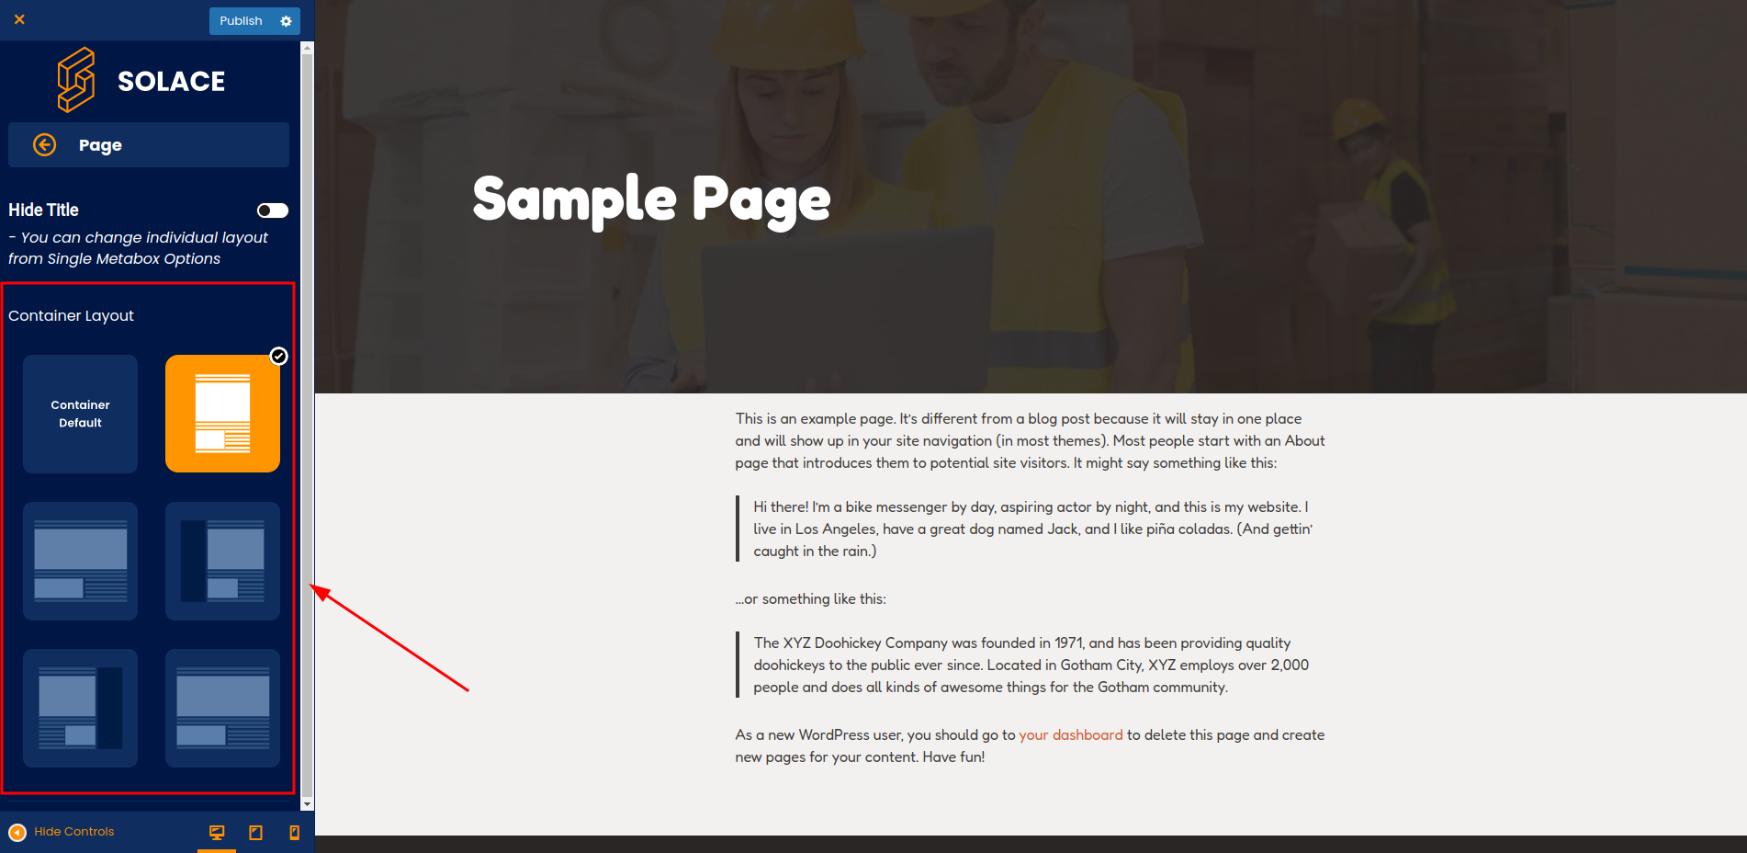
Page Settings
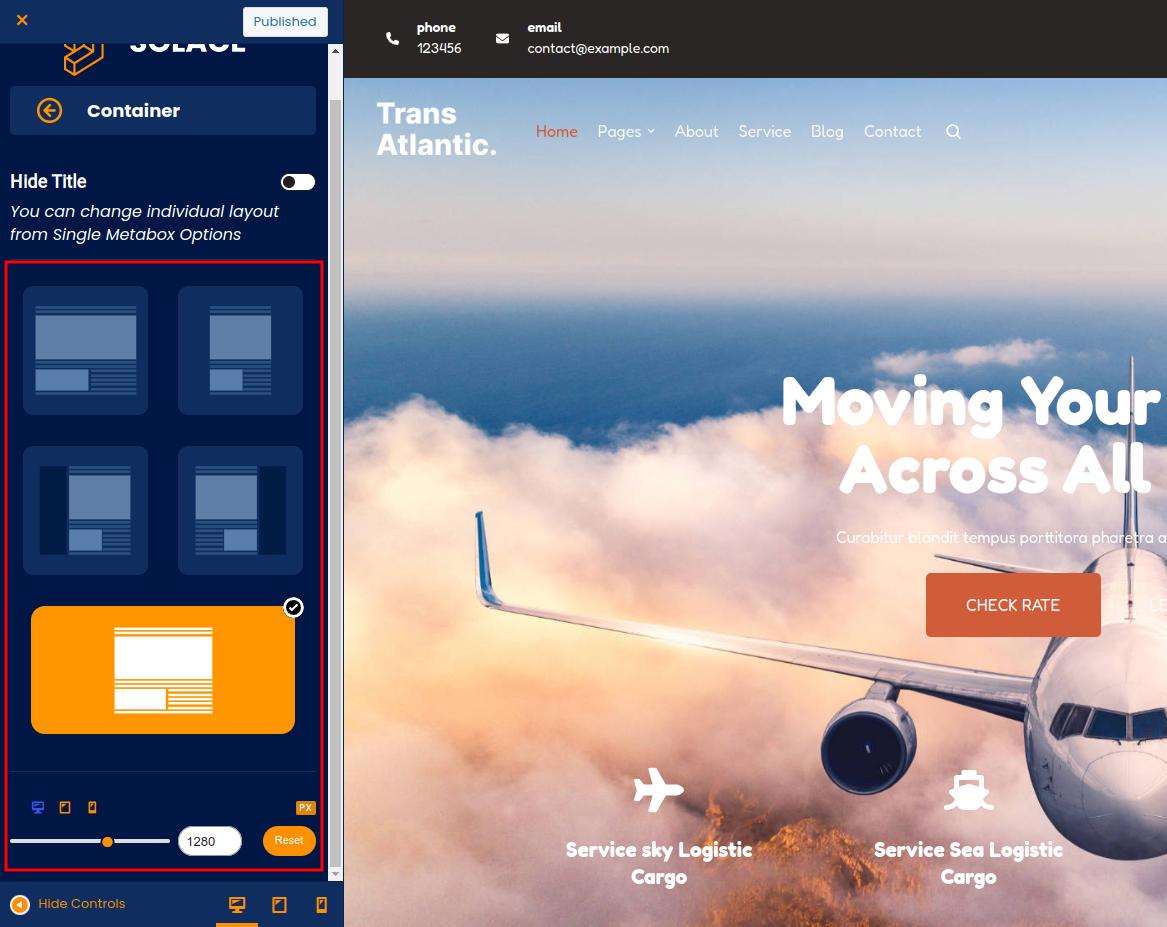
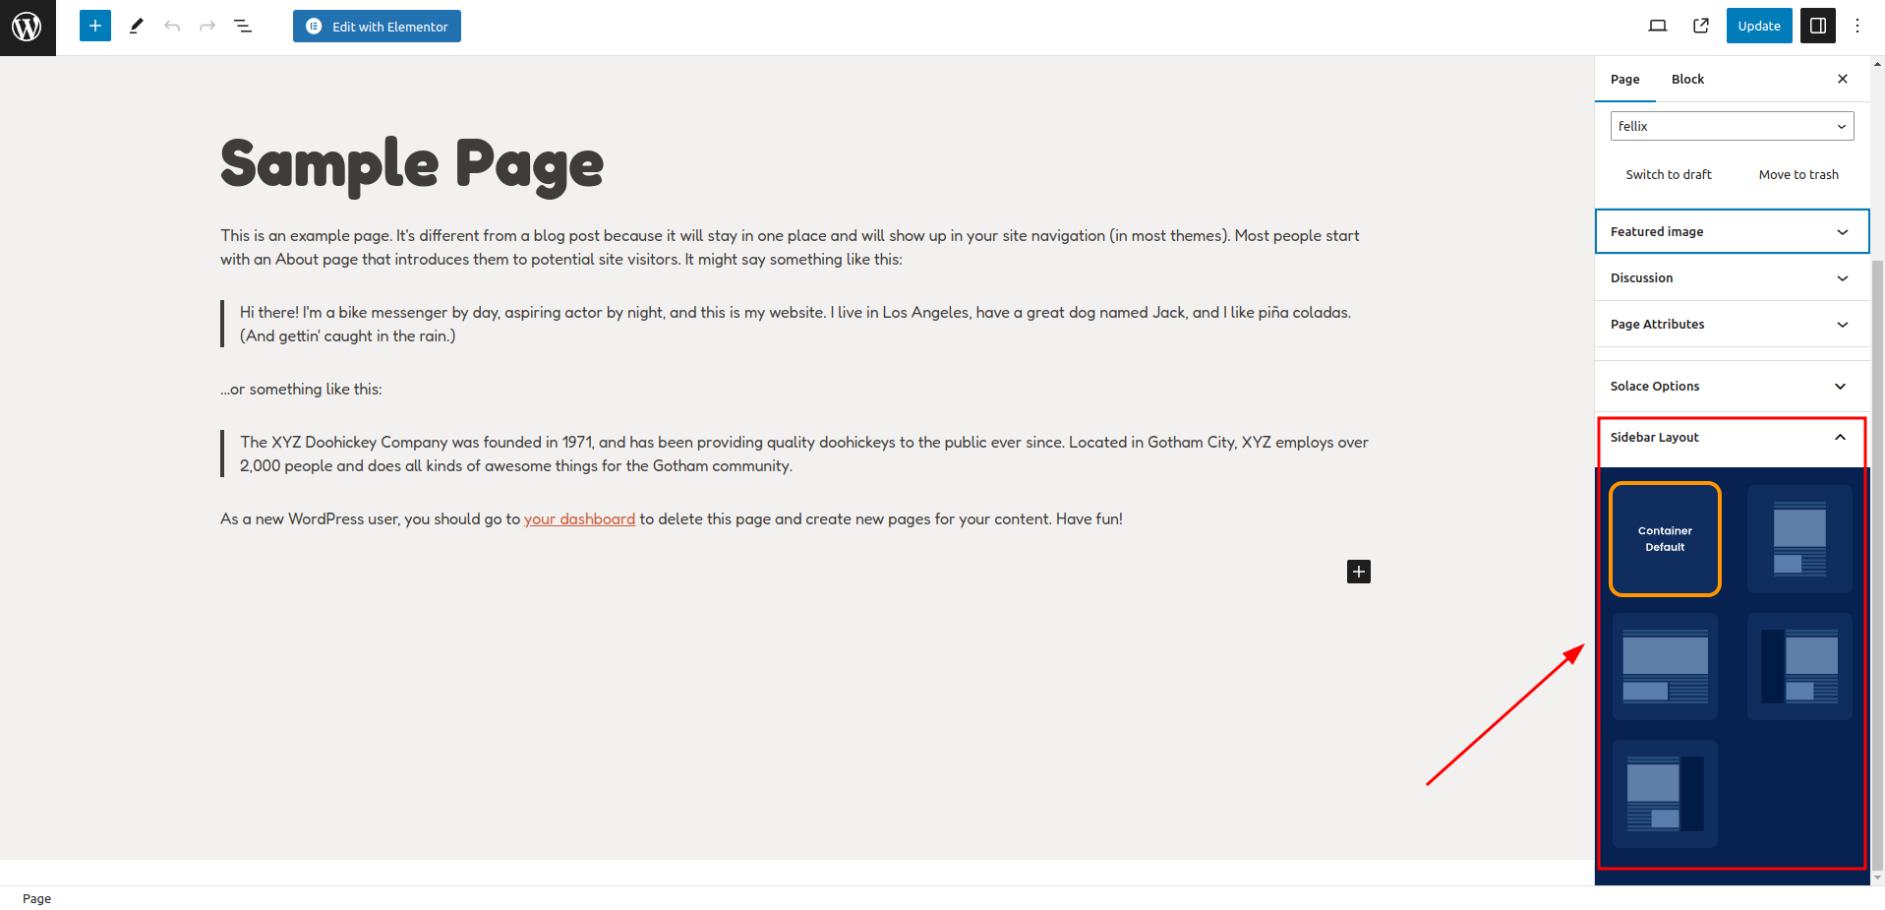
- Container
The default layout of pages created with Gutenberg can be customized using the page settings container. If you’re building a page with Elementor, ignore it.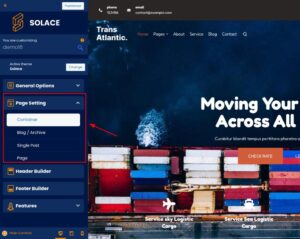
- Boxed: A boxed design establishes clear boundaries for the main section of the page. This layout features a fixed width that encompasses all content. Boxed designs are known for neatly organizing the key elements of a web page.
- Full-Width: With a full-width layout, your website content extends seamlessly from one edge of the user’s screen to the other, delivering an immersive and impactful visual experience. Picture your website occupying the entire screen, resembling a large, attention-grabbing billboard showcasing all your impressive content.
- Left: The Layout widget left sidebar appears on the left side of the website layout, providing a convenient space for displaying important information, navigation menus, or promotional content. This sidebar can help users guide visitors through the site and highlight key features.
- Right: The Layout widget right sidebar is positioned on the right side of the website layout. It serves a similar purpose to the left sidebar but offers a different placement option for users to arrange their content effectively. This sidebar can be used to display additional widgets, advertisements, or social media links.
- Custom: When you choose custom, you can manually set the container layout size in px units for each mode (desktop, tablet, mobile).
- Set the layout on a specific page if you want to use Gutenberg to create pages with different layouts.
- Blog/ Archive
You can use it to set the blog /archive page layout.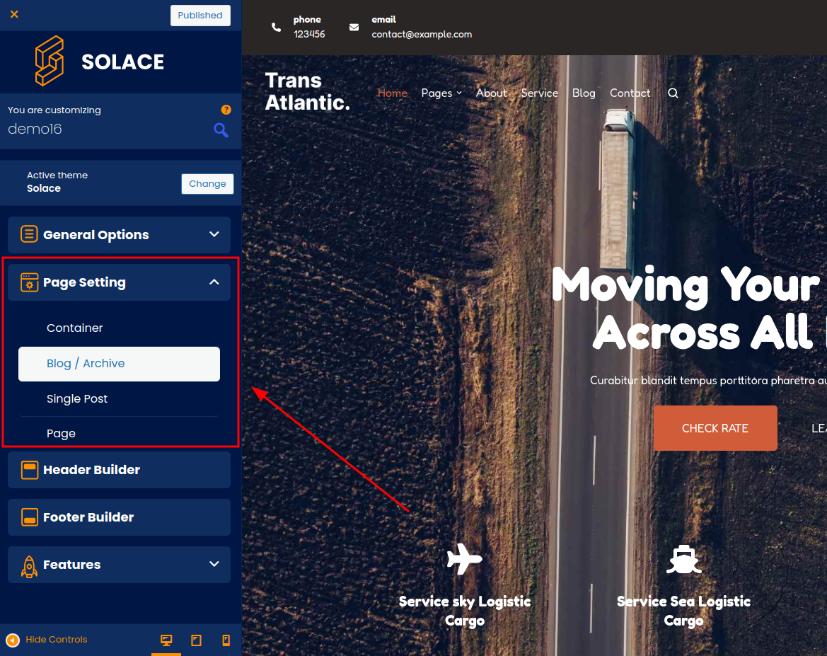
In accordance with your preferences, you can select a 3×3, 2×3, 1×3, or even a custom size.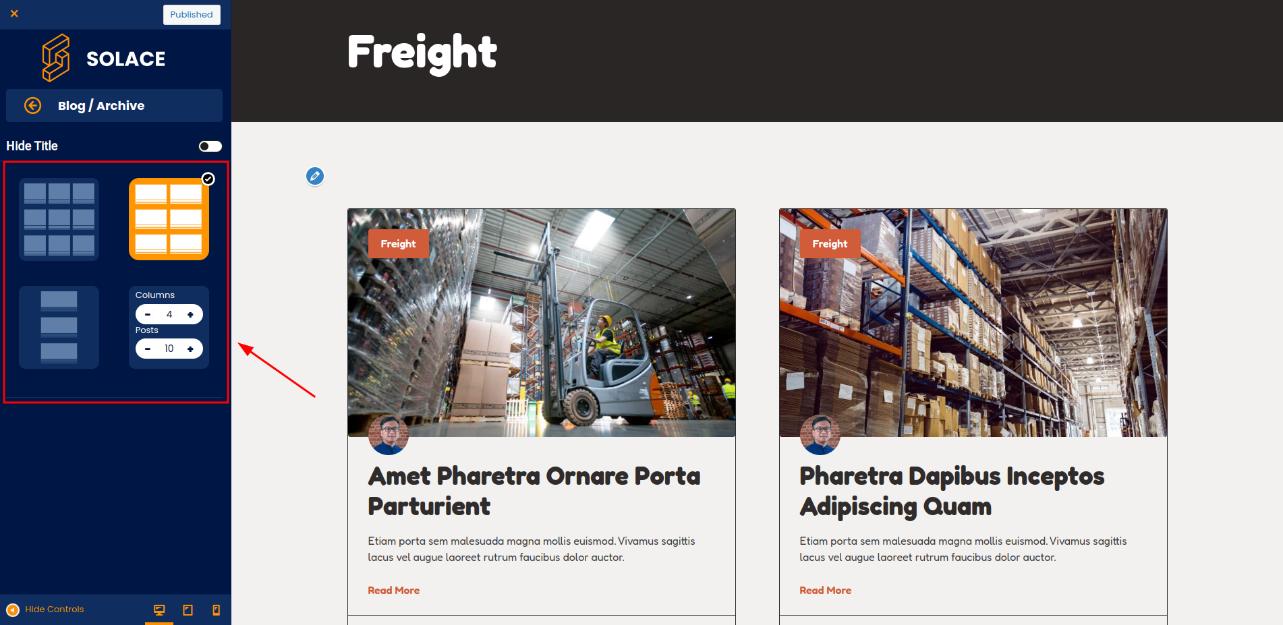
- Single Post
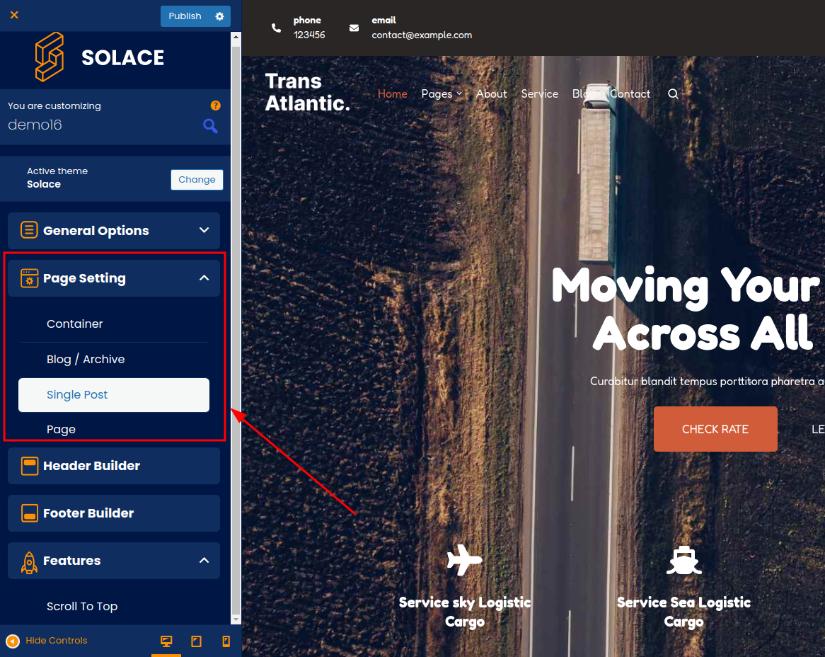
- Single Layout:
Customize the layout for single posts. Choose from 3 types of layouts: Layout 1, Layout 2, or Layout 3.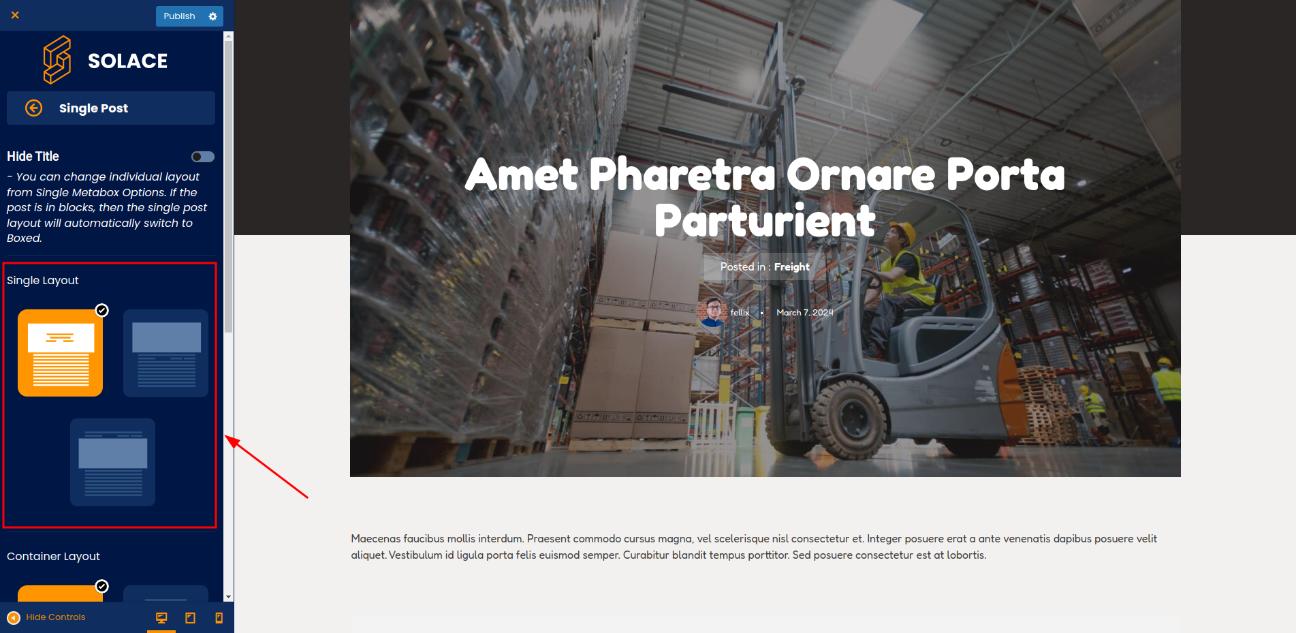
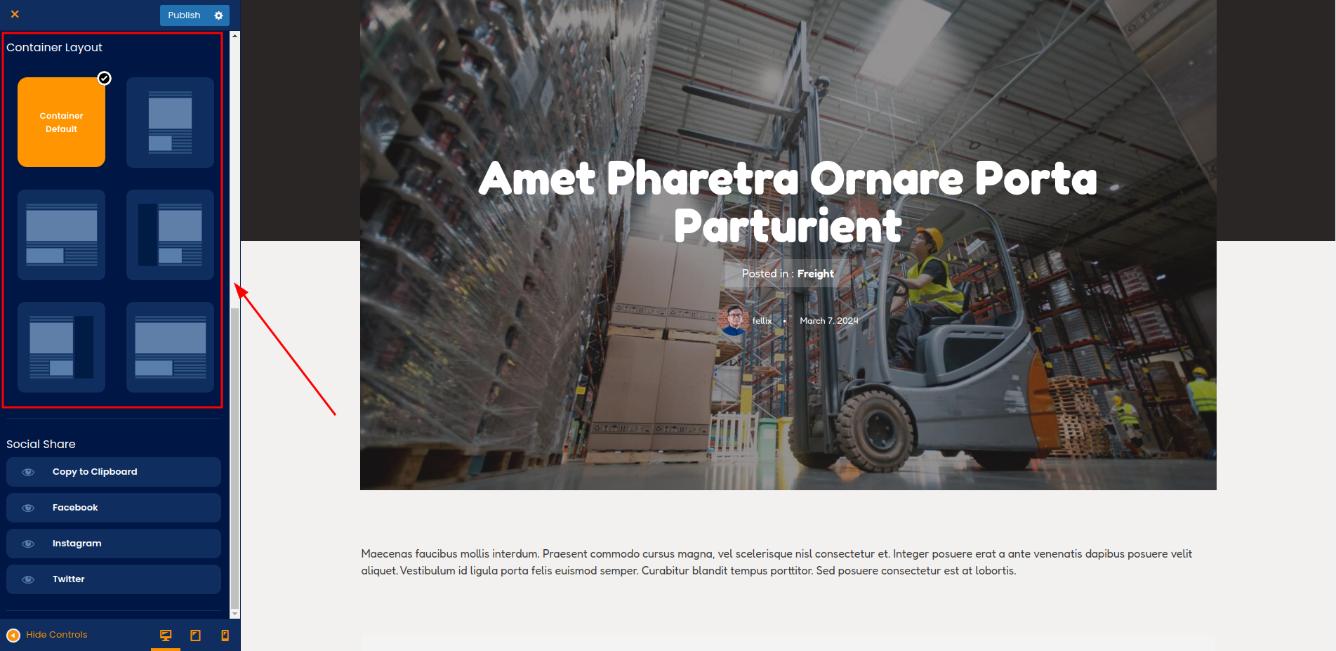
- Container Layout:
- Inherit: Selecting this option will make your single post container layout inherit the layout of the previously set container page.
- Boxed: A boxed design establishes clear boundaries for the main section of the page. This layout features a fixed width that encompasses all content. Boxed designs are known for neatly organizing the key elements of a web page.
- Full-Width: With a full-width layout, your website content extends seamlessly from one edge of the user’s screen to the other, delivering an immersive and impactful visual experience. Picture your website occupying the entire screen, resembling a large, attention-grabbing billboard showcasing all your impressive content.
- Left: The Layout widget left sidebar appears on the left side of the website layout, providing a convenient space for displaying important information, navigation menus, or promotional content. This sidebar can help users guide visitors through the site and highlight key features.
- Right: The Layout widget right sidebar is positioned on the right side of the website layout. It serves a similar purpose to the left sidebar but offers a different placement option for users to arrange their content effectively. This sidebar can be used to display additional widgets, advertisements, or social media links.
- Custom: When you choose custom, you can manually set the container layout size in px units for each mode (desktop, tablet, mobile).
- Social Share:
You can choose to enable or disable social sharing by clicking the eye icon. Currently, the available options include Facebook, Instagram, Twitter, and Copy to Clipboard (which automatically copies the post URL to the clipboard for manual sharing). Additionally, you can rearrange the order by dragging and dropping with the icon bars.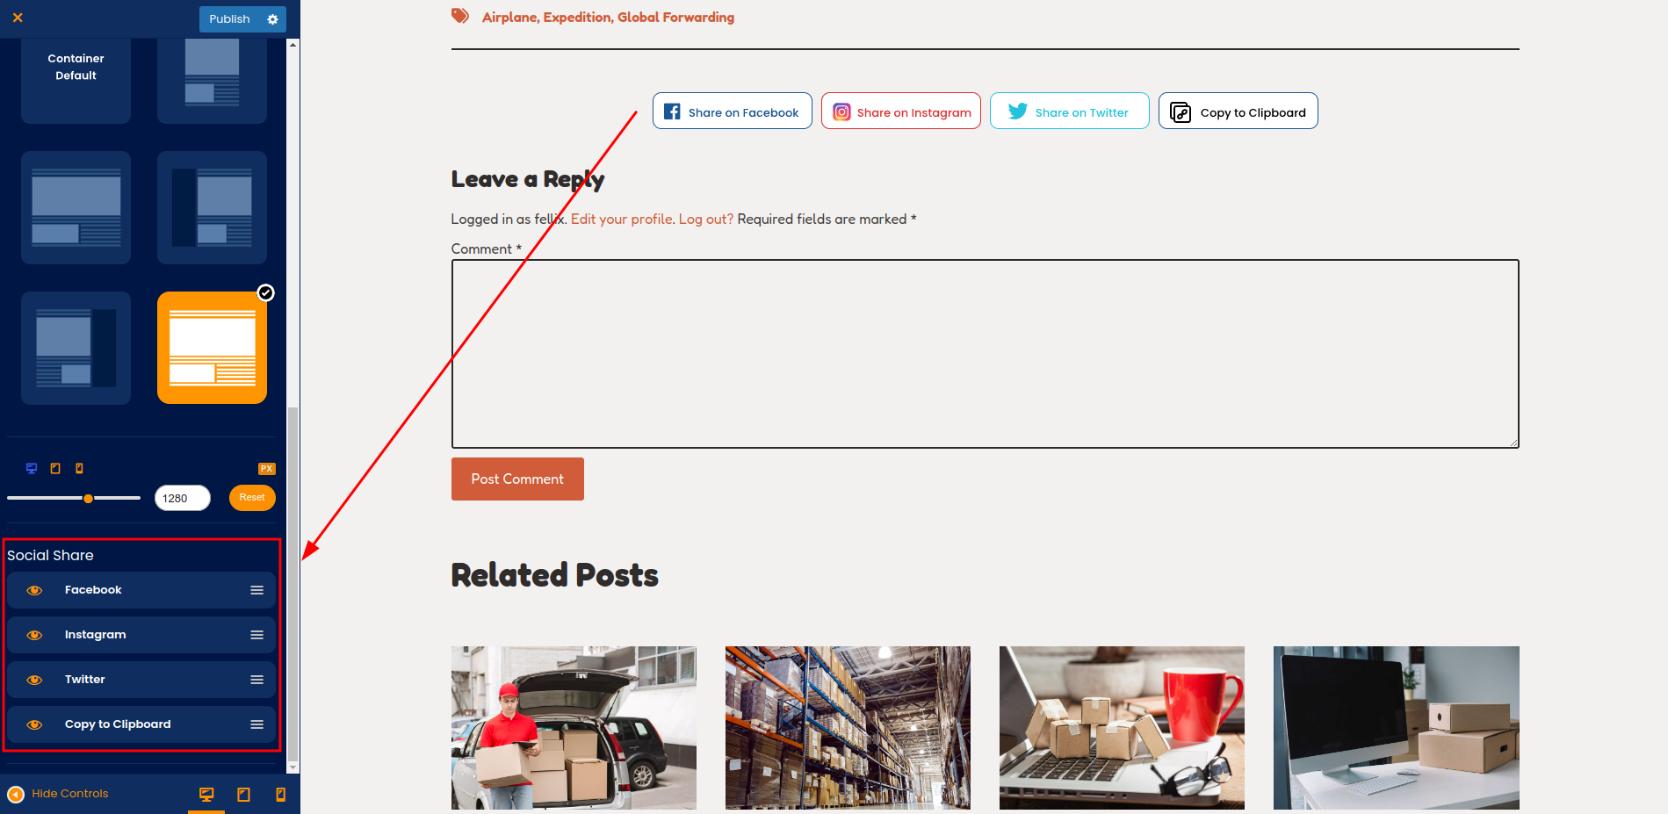
- Single Layout:
- Page
Like a single post, the page has a container layout type. Set the container layout using the Gutenberg builder (WordPress default). If you are using the Elementor builder, this setting will not work, so you can ignore it.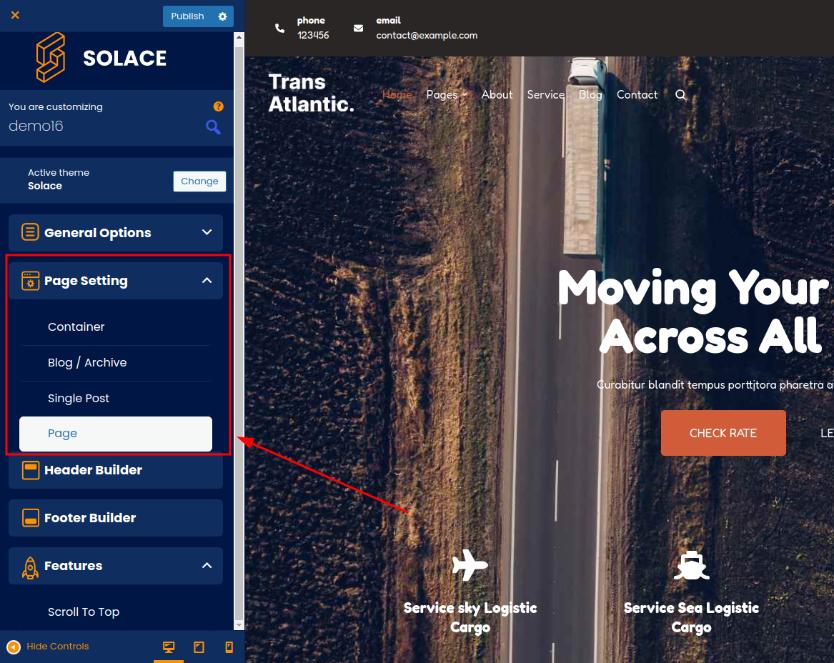
- Inherit: Selecting this option will make your single post container layout inherit the layout of the previously set container page.
- Boxed: A boxed design establishes clear boundaries for the main section of the page. This layout features a fixed width that encompasses all content. Boxed designs are known for neatly organizing the key elements of a web page.
- Full-Width: With a full-width layout, your website content extends seamlessly from one edge of the user’s screen to the other, delivering an immersive and impactful visual experience. Picture your website occupying the entire screen, resembling a large, attention-grabbing billboard showcasing all your impressive content.
- Left: The Layout widget left sidebar appears on the left side of the website layout, providing a convenient space for displaying important information, navigation menus, or promotional content. This sidebar can help users guide visitors through the site and highlight key features.
- Right: The Layout widget right sidebar is positioned on the right side of the website layout. It serves a similar purpose to the left sidebar but offers a different placement option for users to arrange their content effectively. This sidebar can be used to display additional widgets, advertisements, or social media links.
- Custom: When you choose custom, you can manually set the container layout size in px units for each mode (desktop, tablet, mobile).
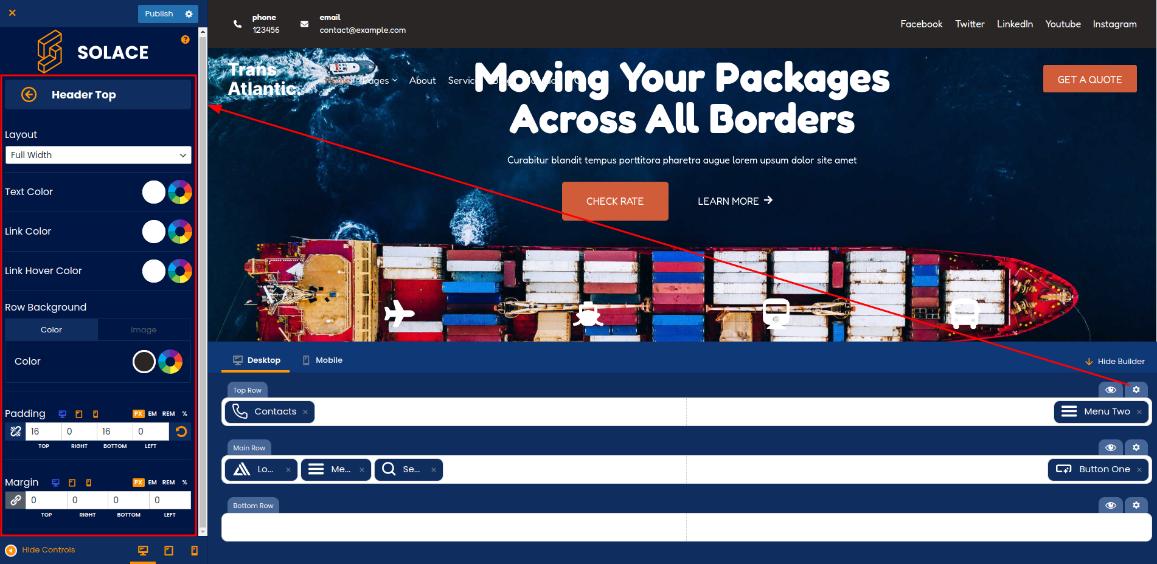
Header Builder
- Presets
Solace offers 7 pre-made header models. 3 rows structure this header: top row, main row, and bottom row.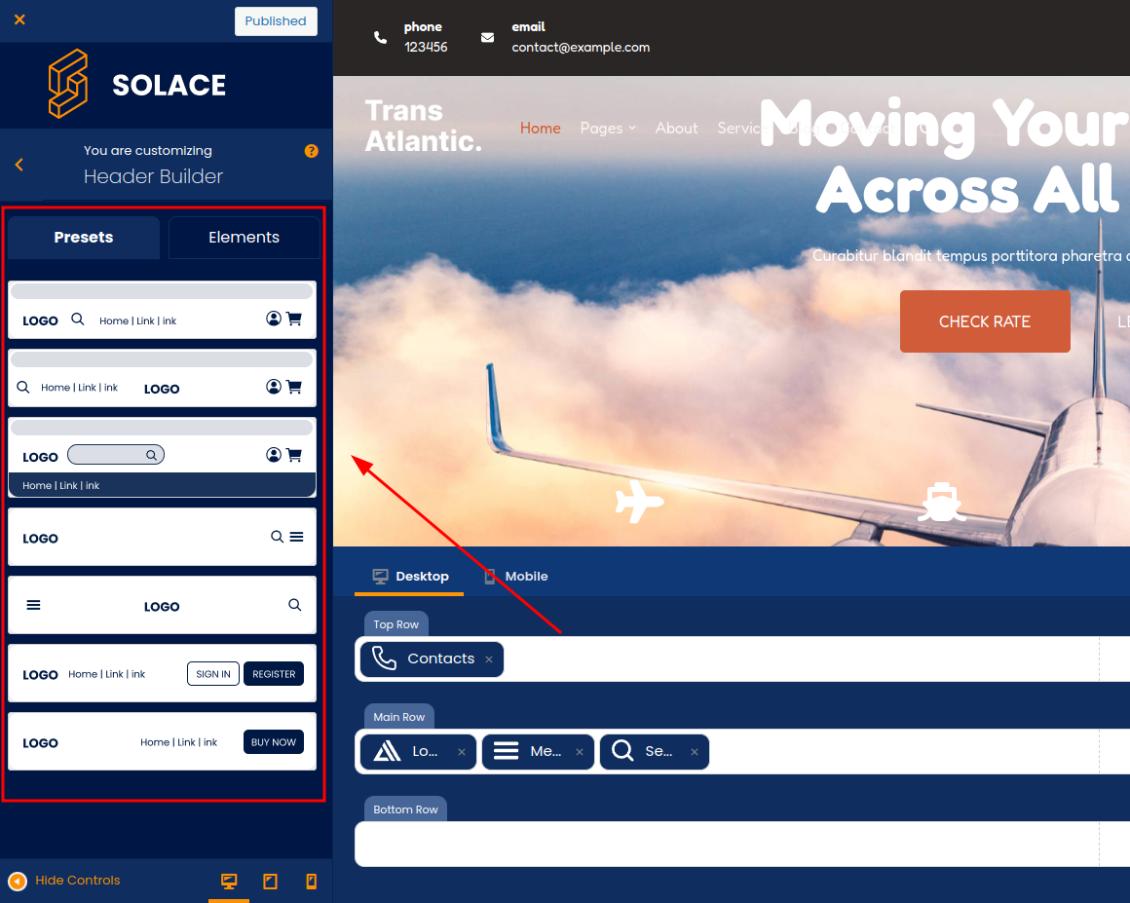
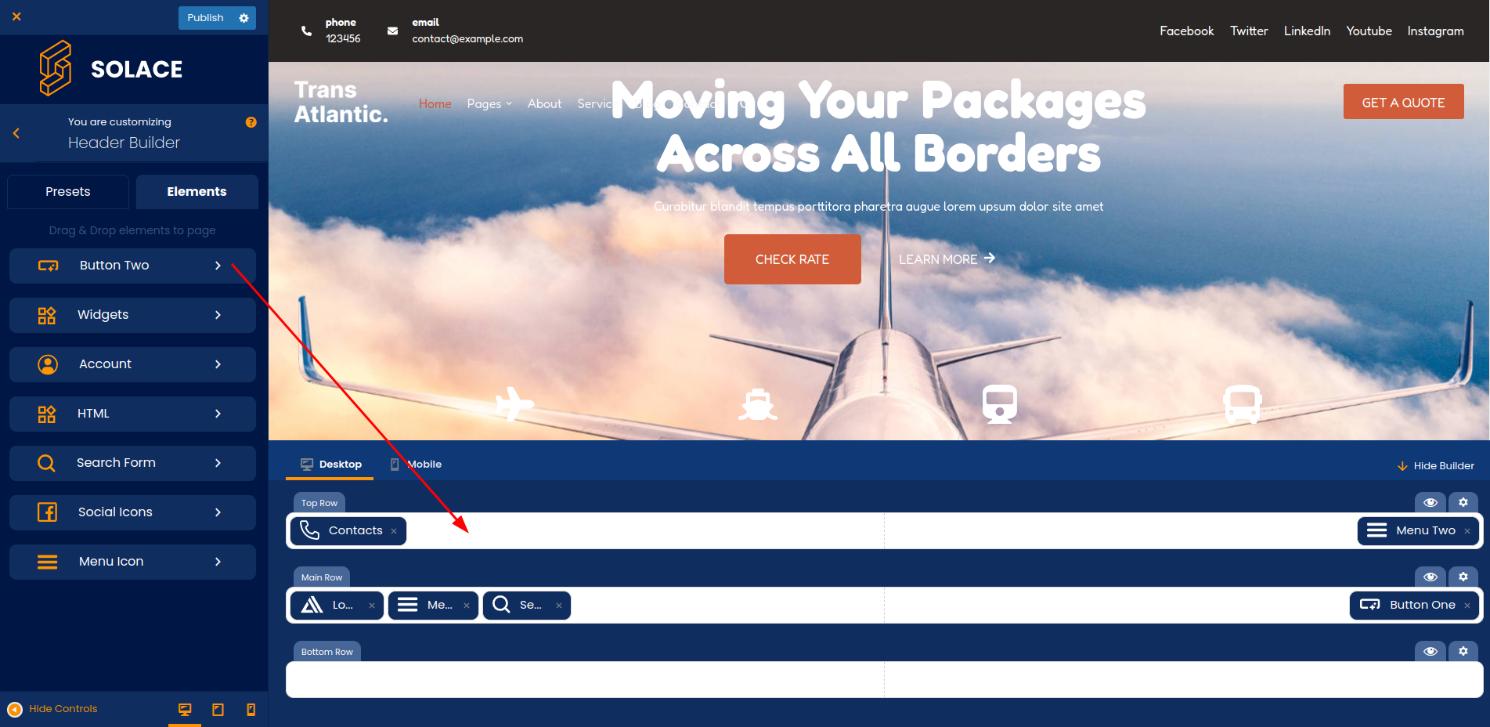
- Elements
- In addition to utilizing the models we’ve made, you can customize the header elements’ arrangement to suit your preferences. The Header Builder allows you to arrange elements in the top, main, or bottom rows.
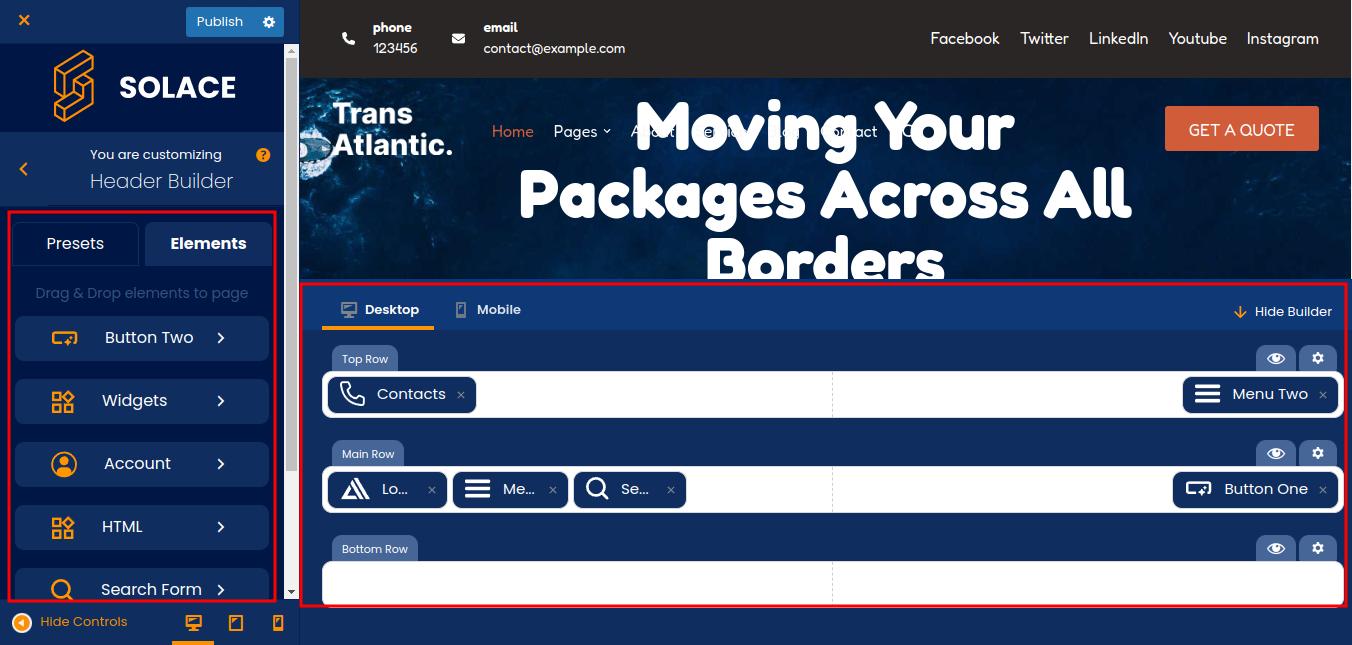
- Simply drag and drop the elements to the needed row to add the element.
- Alternatively, you can click on any column inside the row to which you need to add an element.
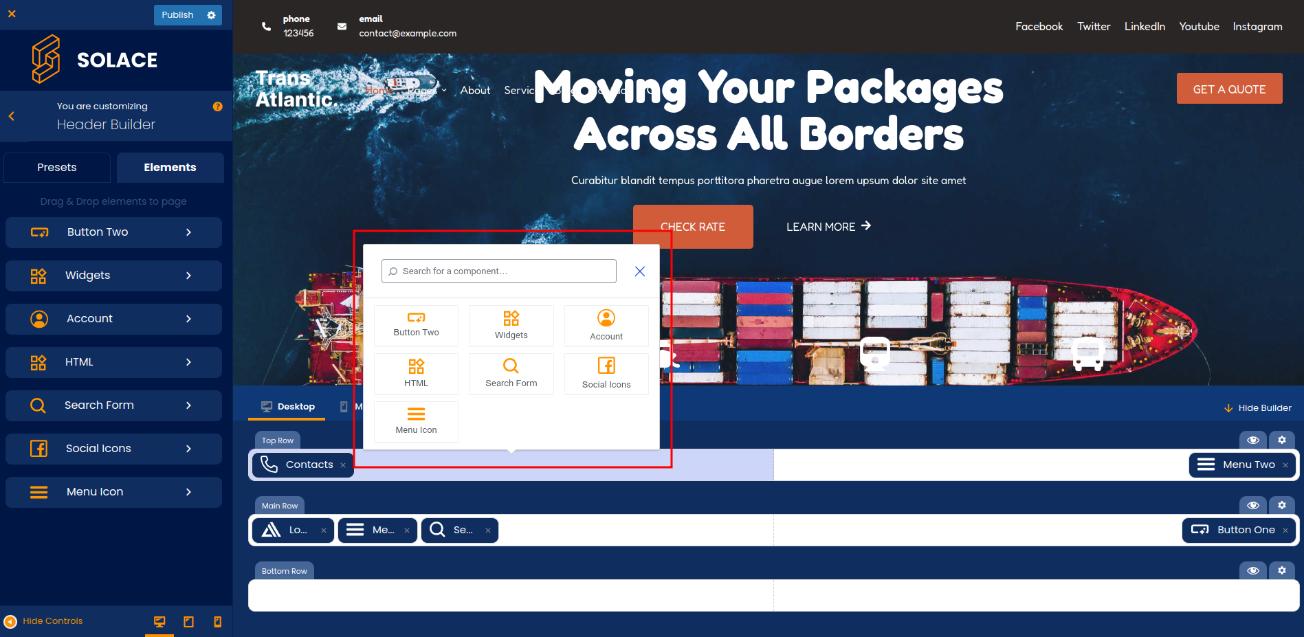
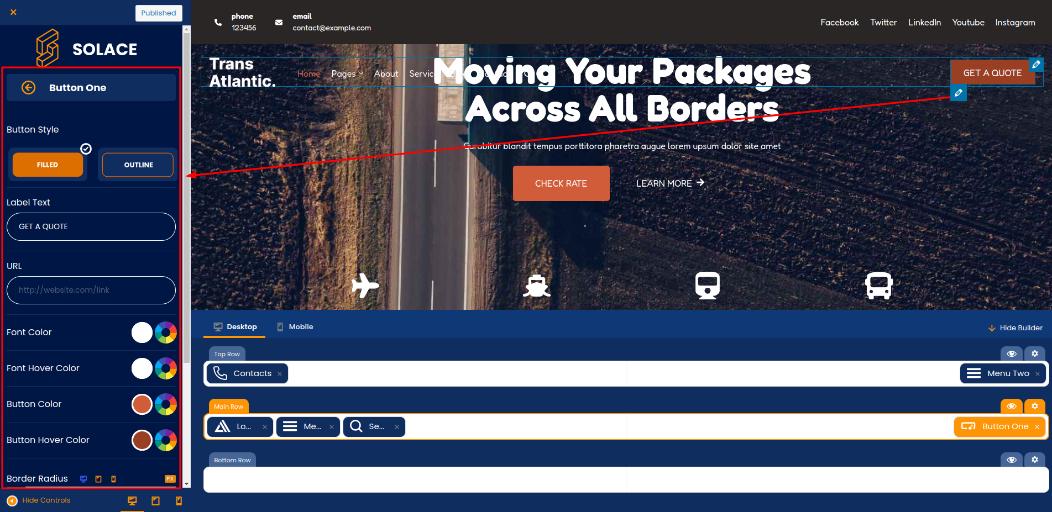
- When you want to customize an element that you have placed in a row, just click on it to open the customization option.
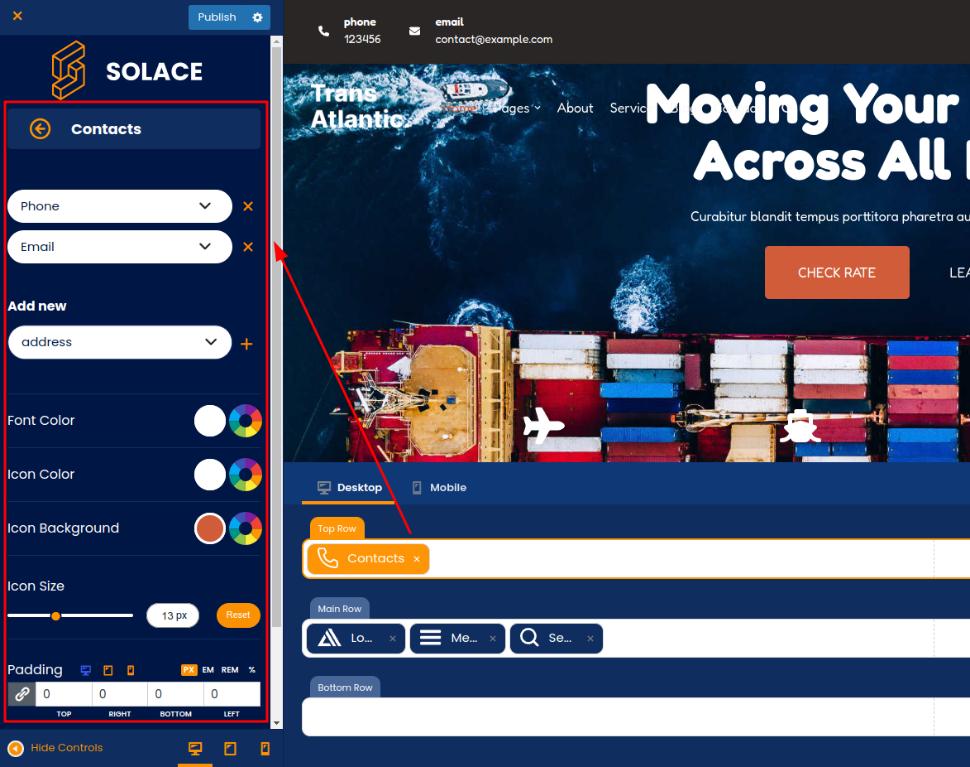
- Alternatively, you may just click the pencil icon beside the element you want to customize.
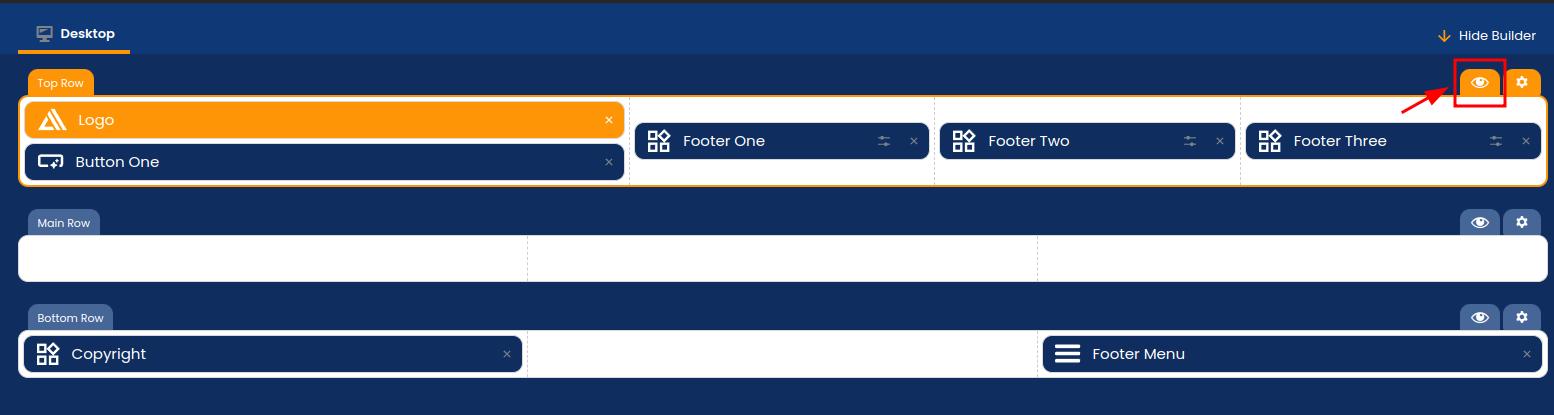
- You may easily hide one of the rows by clicking the eye icon.
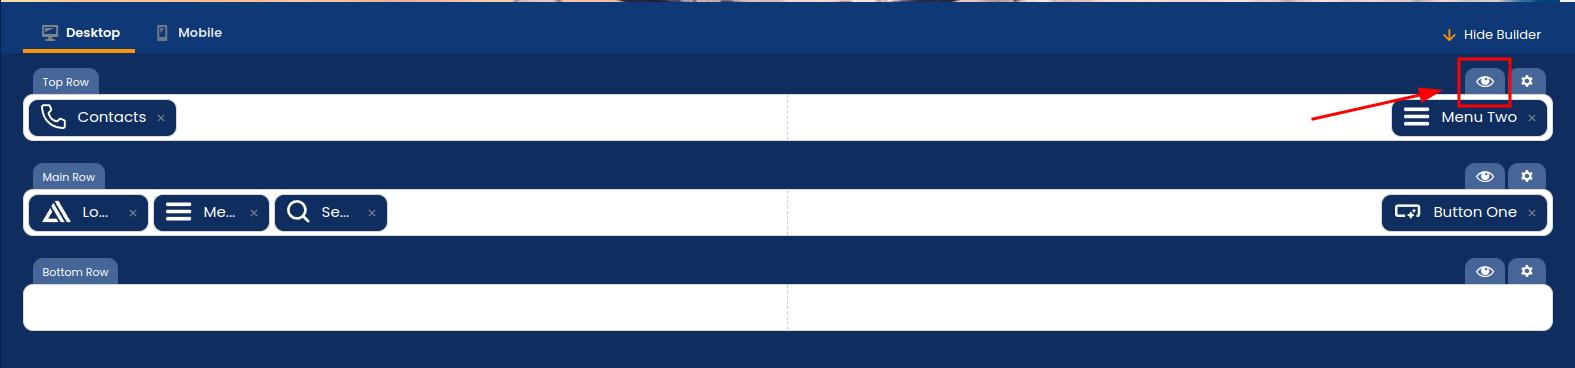
- To customize a row, click the gear icon on your chosen row. As a result, options to modify rows will appear including Row Background, Padding, Margin, Text Color, Link Color, and Link Hover.
- In addition to utilizing the models we’ve made, you can customize the header elements’ arrangement to suit your preferences. The Header Builder allows you to arrange elements in the top, main, or bottom rows.
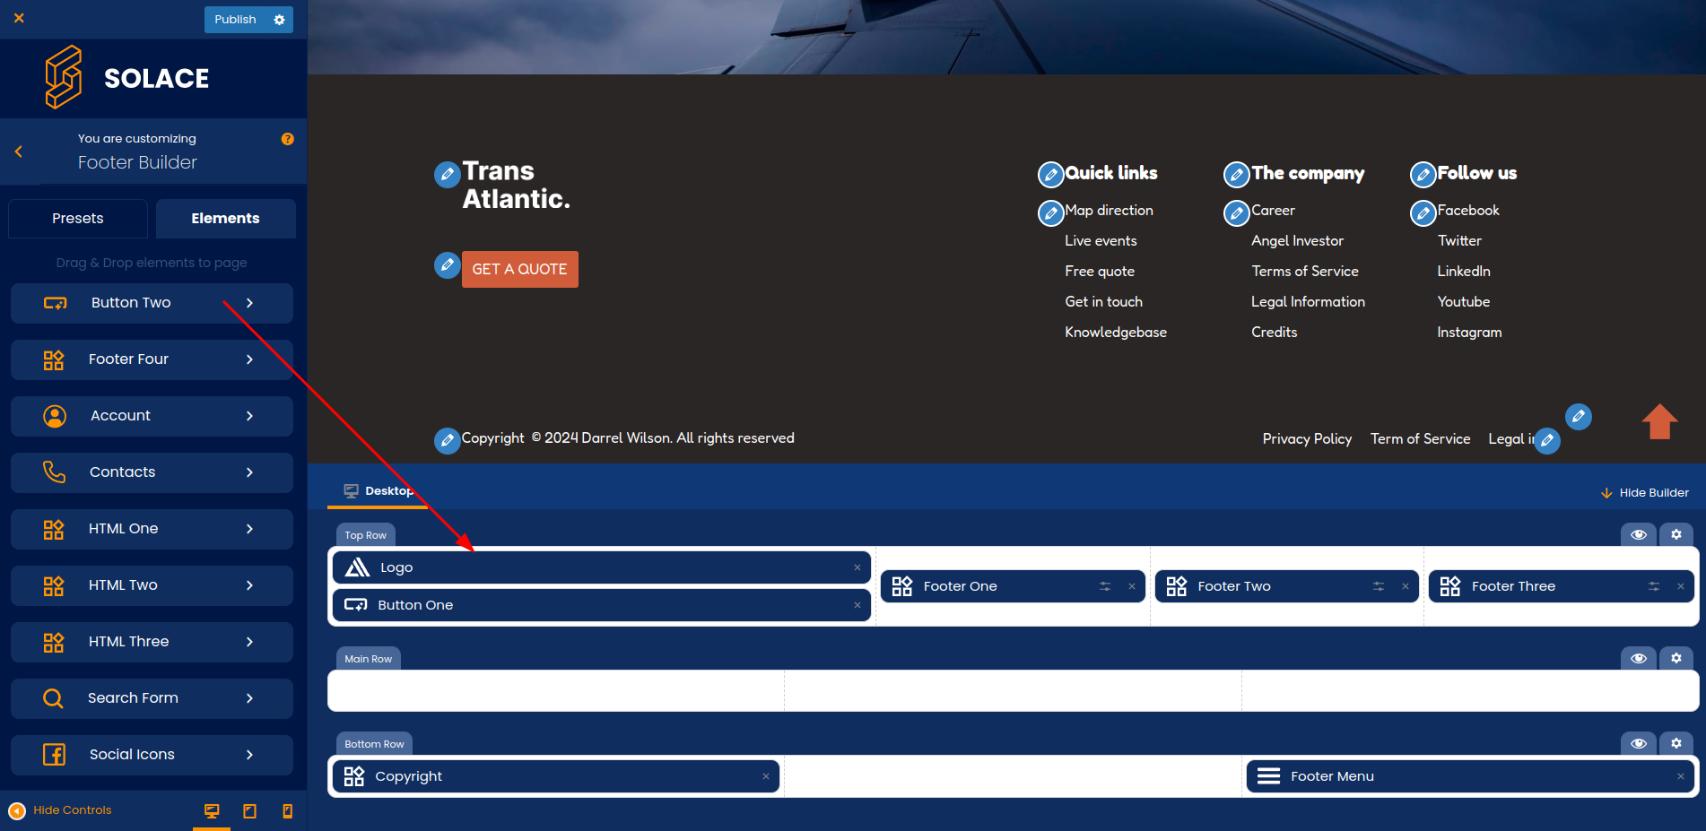
Footer Builder
- Presets
Solace offers 6 pre-made footer models. 3 rows structure this header: top row, main row, and bottom row.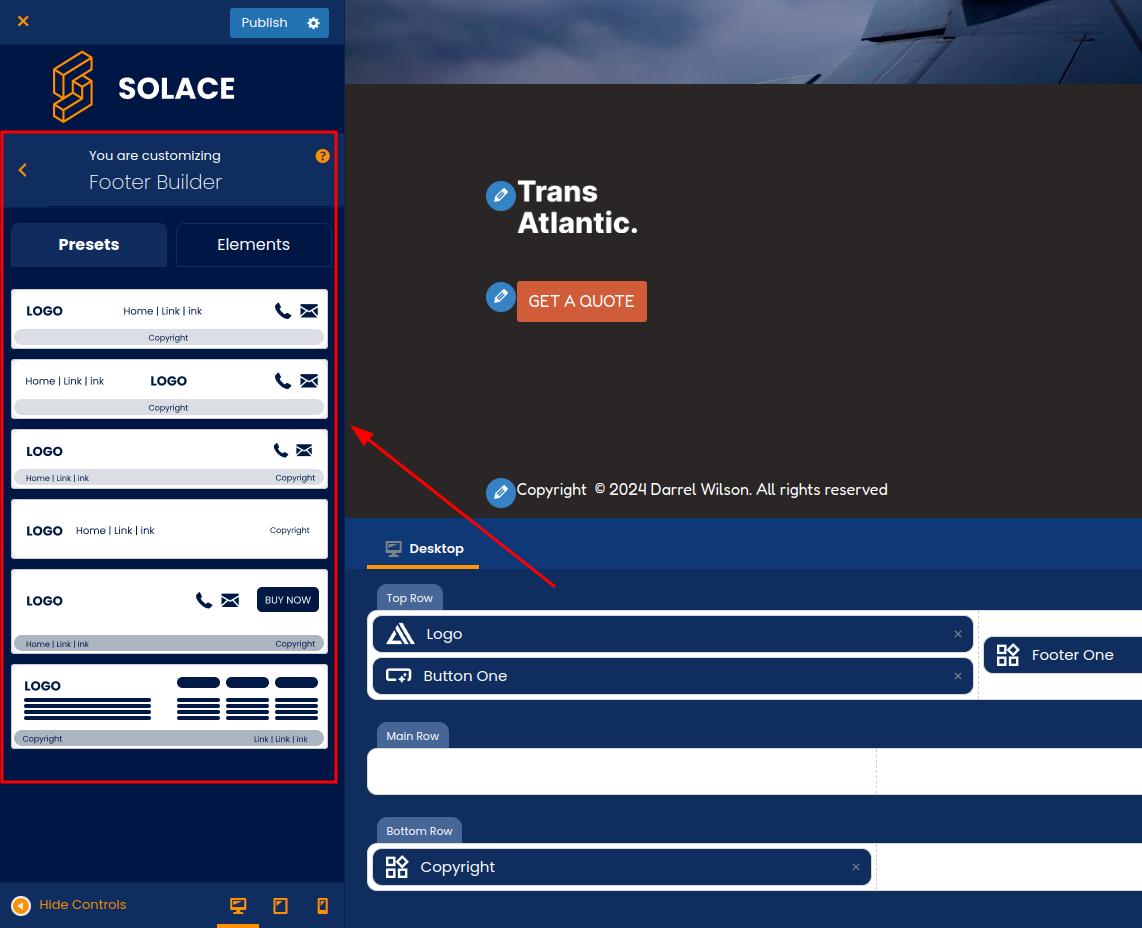
- Elements
- In addition to utilizing the models we’ve made, you can customize the footer elements’ arrangement to suit your preferences. The Footer Builder allows you to arrange elements in the top, main, or bottom rows.
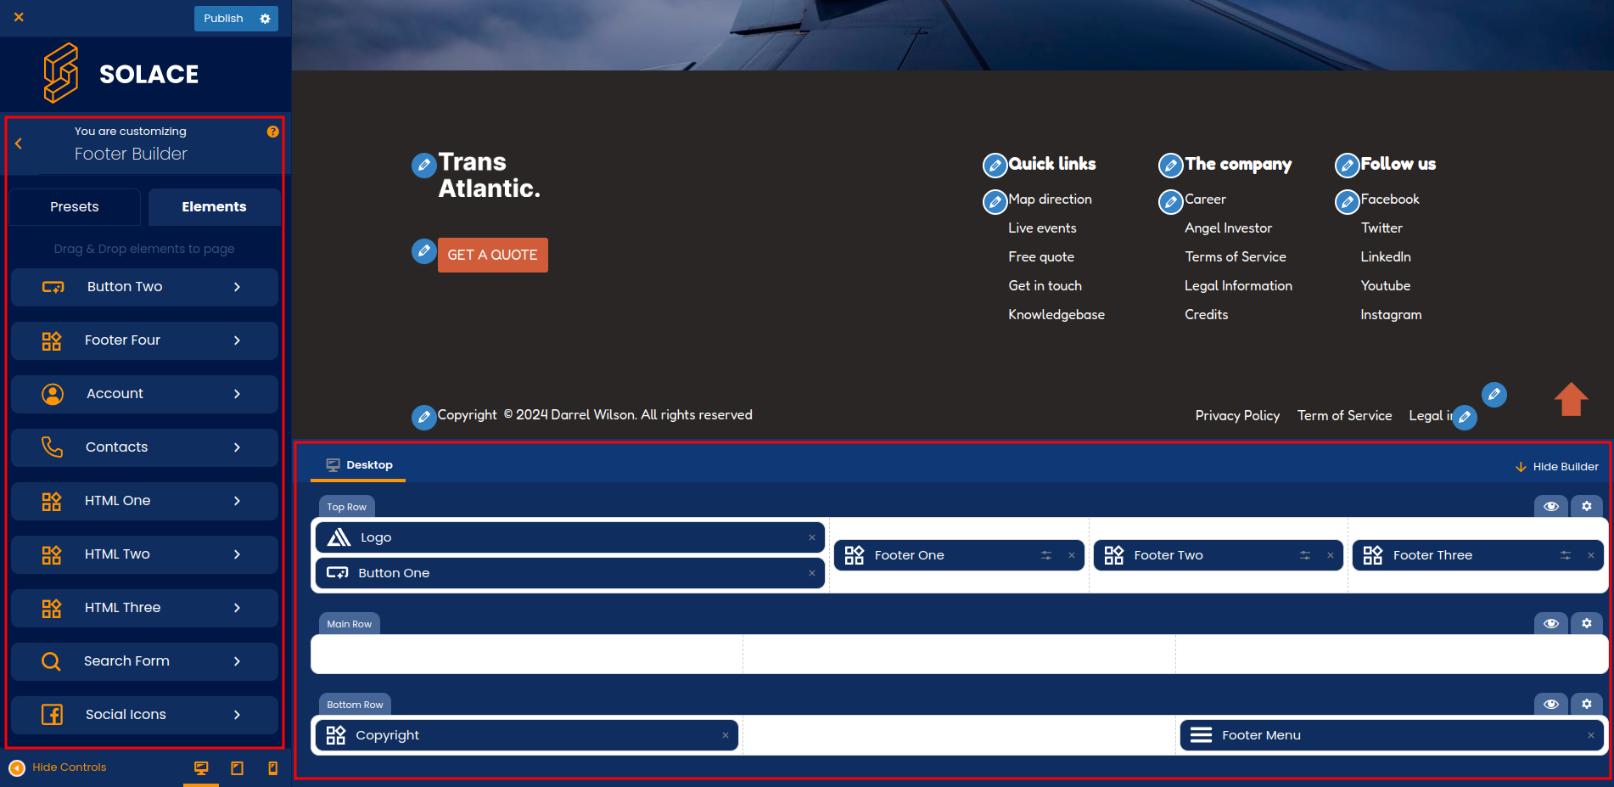
- Simply drag and drop the elements to the needed row to add the element.
- Alternatively, you can click on any column inside the row to which you need to add an element.

- When you want to customize an element that you have placed in a row, just click on it to open the customization option.
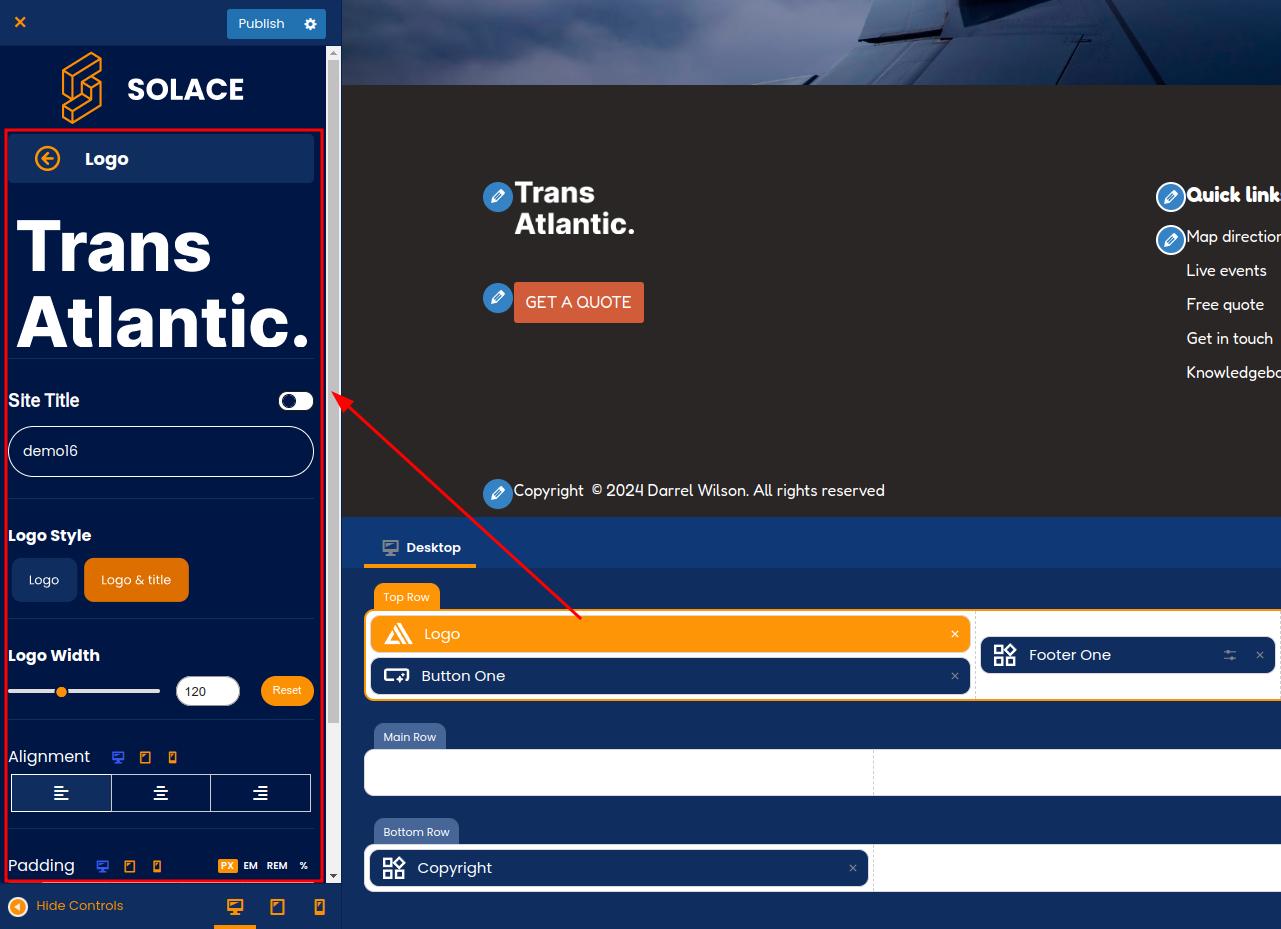
- Alternatively, you may just click the pencil icon beside the element you want to customize

- You may easily hide one of the rows by clicking the eye icon.
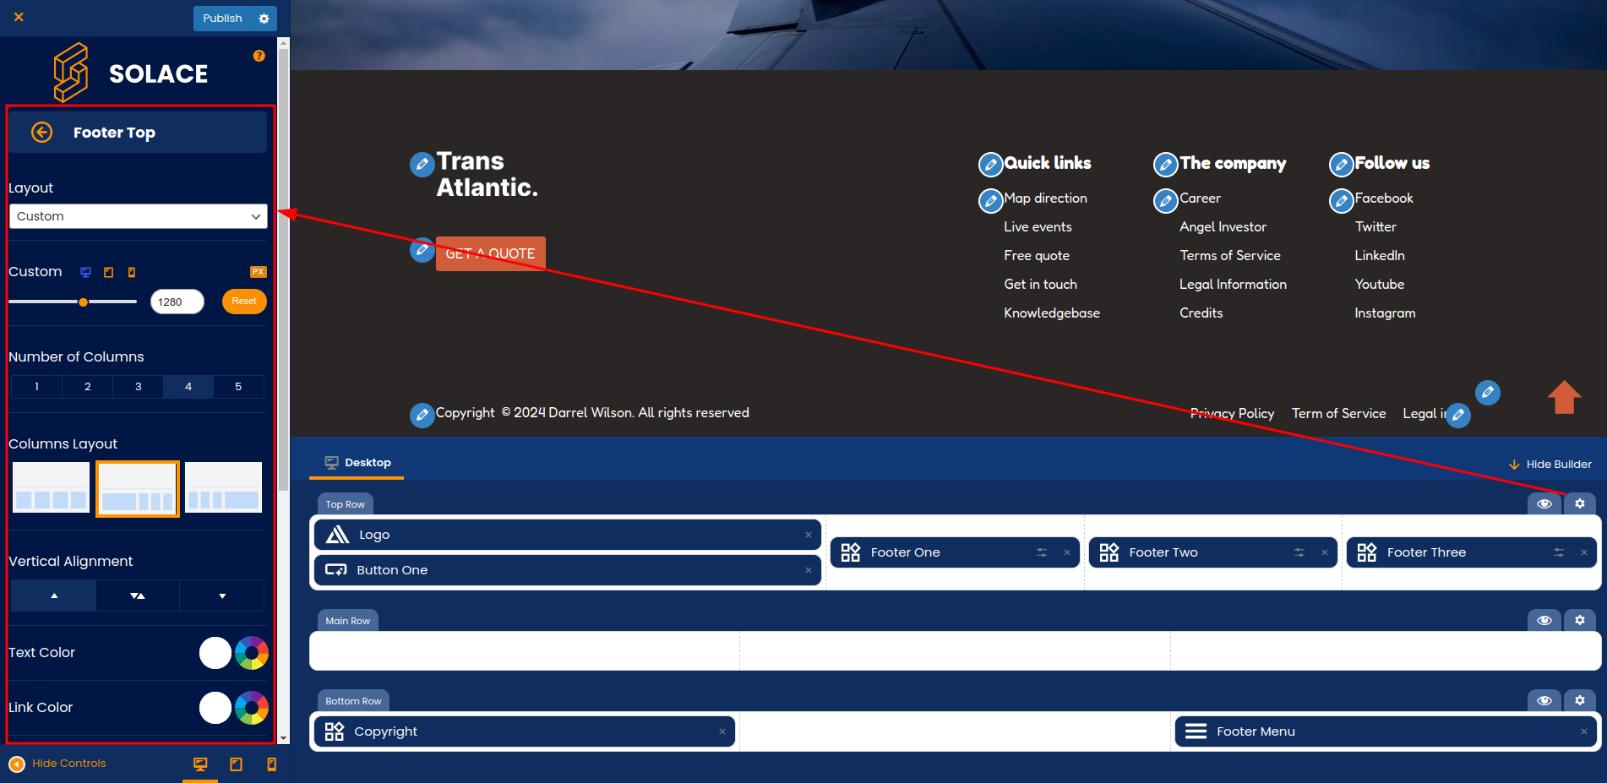
- To customize a row, click the gear icon on your chosen row. As a result, options to modify rows will appear including Layout, Number of Columns, Columns Layout, Vertical Alignment, Row Background, Padding, Margin, Text Color, Link Color, and Link Hover.
- In addition to utilizing the models we’ve made, you can customize the footer elements’ arrangement to suit your preferences. The Footer Builder allows you to arrange elements in the top, main, or bottom rows.
Features
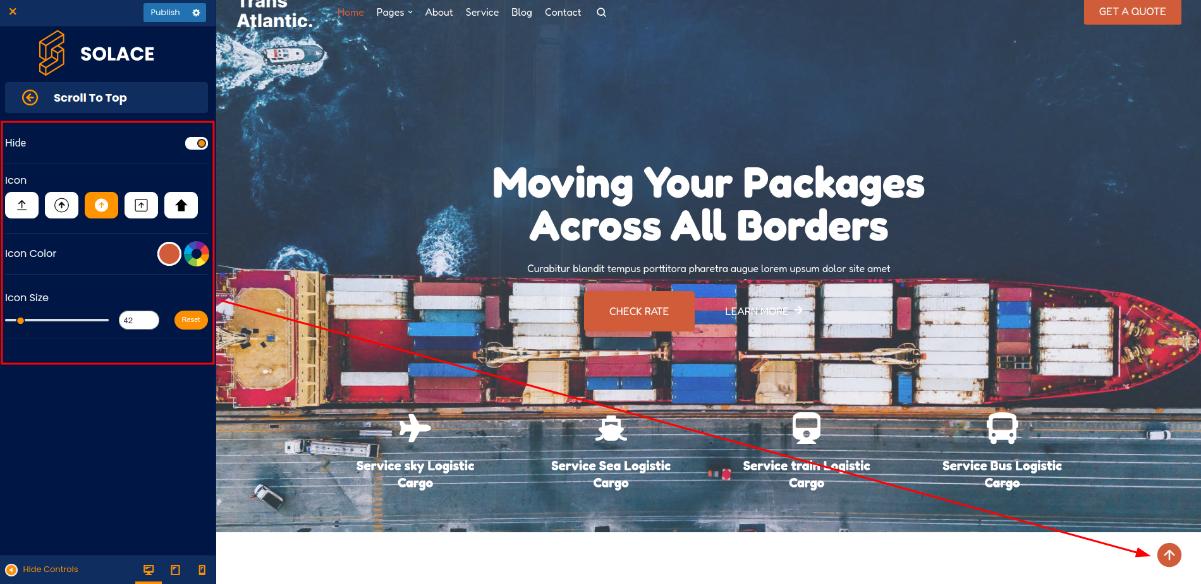
- Scroll to Top
Solace offers a scroll-to-top function. When you scroll down a page or post, an icon appears in the bottom right corner, allowing you to easily return to the top with a simple click.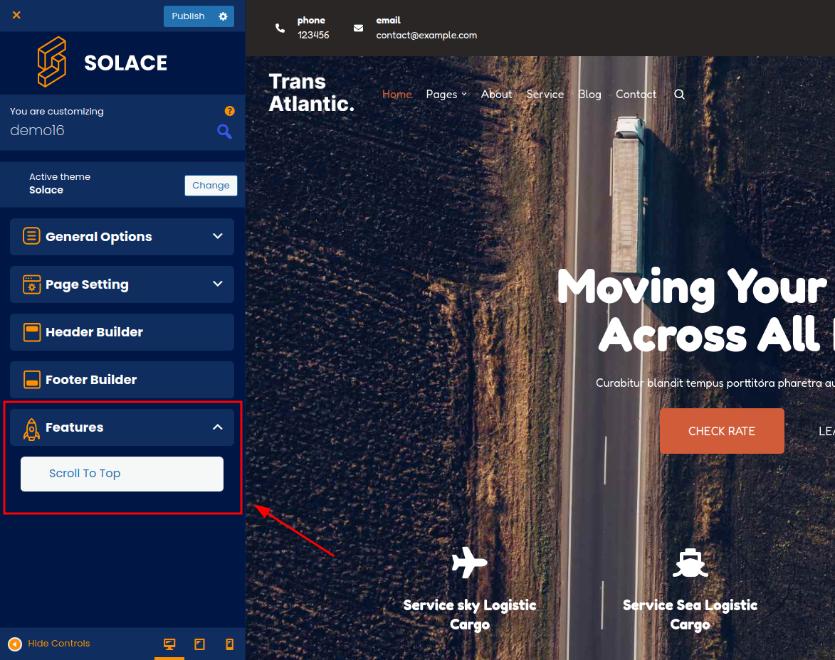
This feature provides 4 customization options:
Hide: Enable this option to show the scroll-to-top feature.
Icon: Choose from 5 available icon options; custom uploads are not supported at this time.
Icon Color: Customize the color to your preference. To use a color saved in Global Colors, select the rainbow circle icon.
Icon Size: Adjust the icon size using pixel units.